A post on ROS Navigation. ROS provides us with a set of software libraries and tools to simplify the task of creating complex robotics applications. ROS Navigation Stack is one such facility that ROS provides in order to carry out the task of autonomous navigation. This post talks about setting up the stack.

Navigation through Robot Environment
It’s been a long time, since I wrote my last post. Honestly, I forgot to write the post amidst of all the Corona Virus outbreak. Nonetheless, I hope everyone who reads this post, is happy and safe during the pandemic.
Overview
The ROS navigation stack provides us with the software libraries to enable our robot to localize and navigate through it’s environment. It takes information from odometry and sensor streams and outputs velocity commands to send to a mobile base. As a pre-requisite for the robot to use navigation stack, the robot must be running ROS(quite obvious), have a well defined tf transform tree and publish sensor data using appropriate ROS Message Types.
Configuring the Navigation Stack
Step by step procedure along with a decent level of debugging skills are required to effectively configure and run the ROS Navigation Stack

Your mission, should you choose to accept it!
Robot Setup

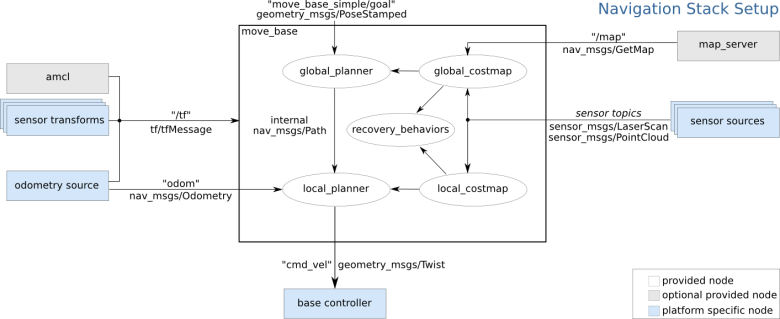
Navigation Stack Setup
The navigation stack assumes that the robot is configured in a particular manner in order to run. The diagram above shows an overview of the configuration.
-
Transform Configuration: The navigation stack requires that the robot is publishing information about the relationships between the coordinate frames using tf. To put it simply, the transform tree defines the offsets in terms of both translations and rotation between different coordinate frames. Following certain conventions while assigning frames to our robot, ensures that our tf is published properly. It is recommended to follow conventions while naming frames, but we can avoid it by changing certain settings. Check out this link for conventions. Launching various nodes allow us to publish the transform data to /tf topic. Check out the instructions here for C++ and Python.
-
Sensor Information: In order to avoid obstacles in the world, the navigation stack uses information from sensors. It assumes that these sensors are publishing either sensor_msgs/LaserScan or sensor_msgs/PointCloud messages over ROS. Nonetheless, we can change certain settings to allow for different sensor streams.
-
Odometry Information: The navigation stack requires the odometry information using tf and the nav_msgs/Odometry message. tf is used to determine the robot’s location in the world, but odometry information is required to determine the robot’s velocity, in order to carry out local path planning. Similar to tf publishing, activating certain nodes enable us to publish odometry information. Check out the instructions here for C++ and Python.
-
Base Controller: The navigation stack sends velocity commands using geometry_msgs/Twist message to cmd_vel topic. Again, the default settings can be changed.
-
Mapping: The map_server hosts the map the robot is trying to navigate through. We can either use a prebuilt map or generate a map using sensor information from robot.
Navigation Stack Setup
To add navigation to our robot, we need to launch 3 new nodes:
- map_server, to provide the static map against which the robot will localize and plan.
- amcl, to localize the robot against static map
- move_base, to handle global planning and local control for the robot
To run map_server, inside our launch file we can have a similar command:
<node name="map_server" pkg="map_server" type="map_server" args="$(find map_location)/map.yaml"/>

Simultaneous Mapping
amcl will allow us to localize the robot on our map. While amcl is extremely configurable and generally does need to be tuned for good performance. However the tuning depends on our purpose and the map. Add the following to the launch file, depending on your robot configuration:
<include file="$(find amcl)/examples/amcl_diff.launch">
OR
<include file="$(find amcl)/examples/amcl_omni.launch">

Pose Estimation
In order to set up move_base, we need to set some configurations. First, we need to set the parameters that will be common to both the global and local costmaps, that are used by move_base. Create a file called costmap_common_params.yaml.

cmd_vel topic in ROS
To configure global costmap, create a file called global_costmap_params.yaml. In this file, we can change the default base_frame and the global_fixed_frame.
Create a file called local_costmap_params.yaml, to configure local costmap options. We can change, the odometry frame, and the robot base frame in this file.
We also need to configure the base local planner, which does the actual work of planning paths and computing control commands. Create a file called base_local_planner_params.yaml.
For more information and configuration options, check out this link.
To launch move_base add the following to the main launch file
<node pkg="move_base" type="move_base" respawn="false" name="move_base" output="screen">
	<rosparam file="$(find pkg)/costmap_common_params.yaml" command="load" ns="global_costmap"/>
	<rosparam file="$(find pkg)/costmap_common_params.yaml" command="load" ns="local_costmap"/>
	<rosparam file="$(find pkg)/local_costmap_params.yaml" command="load"/>
	<rosparam file="$(find pkg)/global_costmap_params.yaml" command="load"/>
	<rosparam file="$(find pkg)/base_local_planner_params.yaml" command="load"/>
</node>
Running the Navigation Stack
Launch the generated ROS Launch file to start navigating. Behind the scenes, ROS Navigation Stack implements a Simple Action Server. Therefore, we can command the robot using RViz or by sending Goals to the server. Check out these links to send Goals using Python and C++. RViz provides a really easy interface to command the robot, compared to Sending Goals using code. As usual, The Construct provides a wonderful tutorial on using RViz for sending Navigation Goals.
References
Programming Robots with ROS, by Morgan Quigley, Brian Gerky & William D.Smart