
Week 11-12 - More demos and library entries
This 2 weeks were focused on refining the user experience creating 2 new demos and add new entries to the standard library.
Bug fixes and improvements
In the last blog entry I defined the naming scheme of the subtree library. After more testing there have been a couple of changes in order to be compliant with the naming shemes of both python classes and xml. So now, the naming scheme is as follows for both the user library and the standard library.
- For subtrees: myName_subtreeName.json.
- For actions: myName_action.py.
With this change, now the subtree library works perfectly fine and has now been tested in a real demo that will be explained further down.
Also there have been some bugs fixed:
- Failed to load outputs of an action correctly. Instead it always load them as inputs. Issue 320
- Subtree Monitor: blackboard nodes did not work if the content was multiline and the content cover all screen, so it has been changed to only show the first 50 chars. Issue 324
- The naming scheme in the subtree library as mentioned above. Issue 326
Warehouse Robot Demo
To continue on the testing of the new BT Studio and all of the changes done during this GSoC I tried solving another exercise from Robotics Academy, called Amazon Warehouse, using Behavior Trees.
Another goal of this new demo was to create subtrees that will later be added to the subtree library.
The exercise consist of moving the shelf in the warehouse with an Amazon robot to the center of the warehouse.
For this demo I choosed the Warehouse 1 because it is the smallest and the easiest one to test in.
After deciding on the world I focused on the design of the Behavior Tree. For that I decided that a combination of multiple sequences with decorators inside of subtrees would be enough to solve it, and for the actions I used 10:
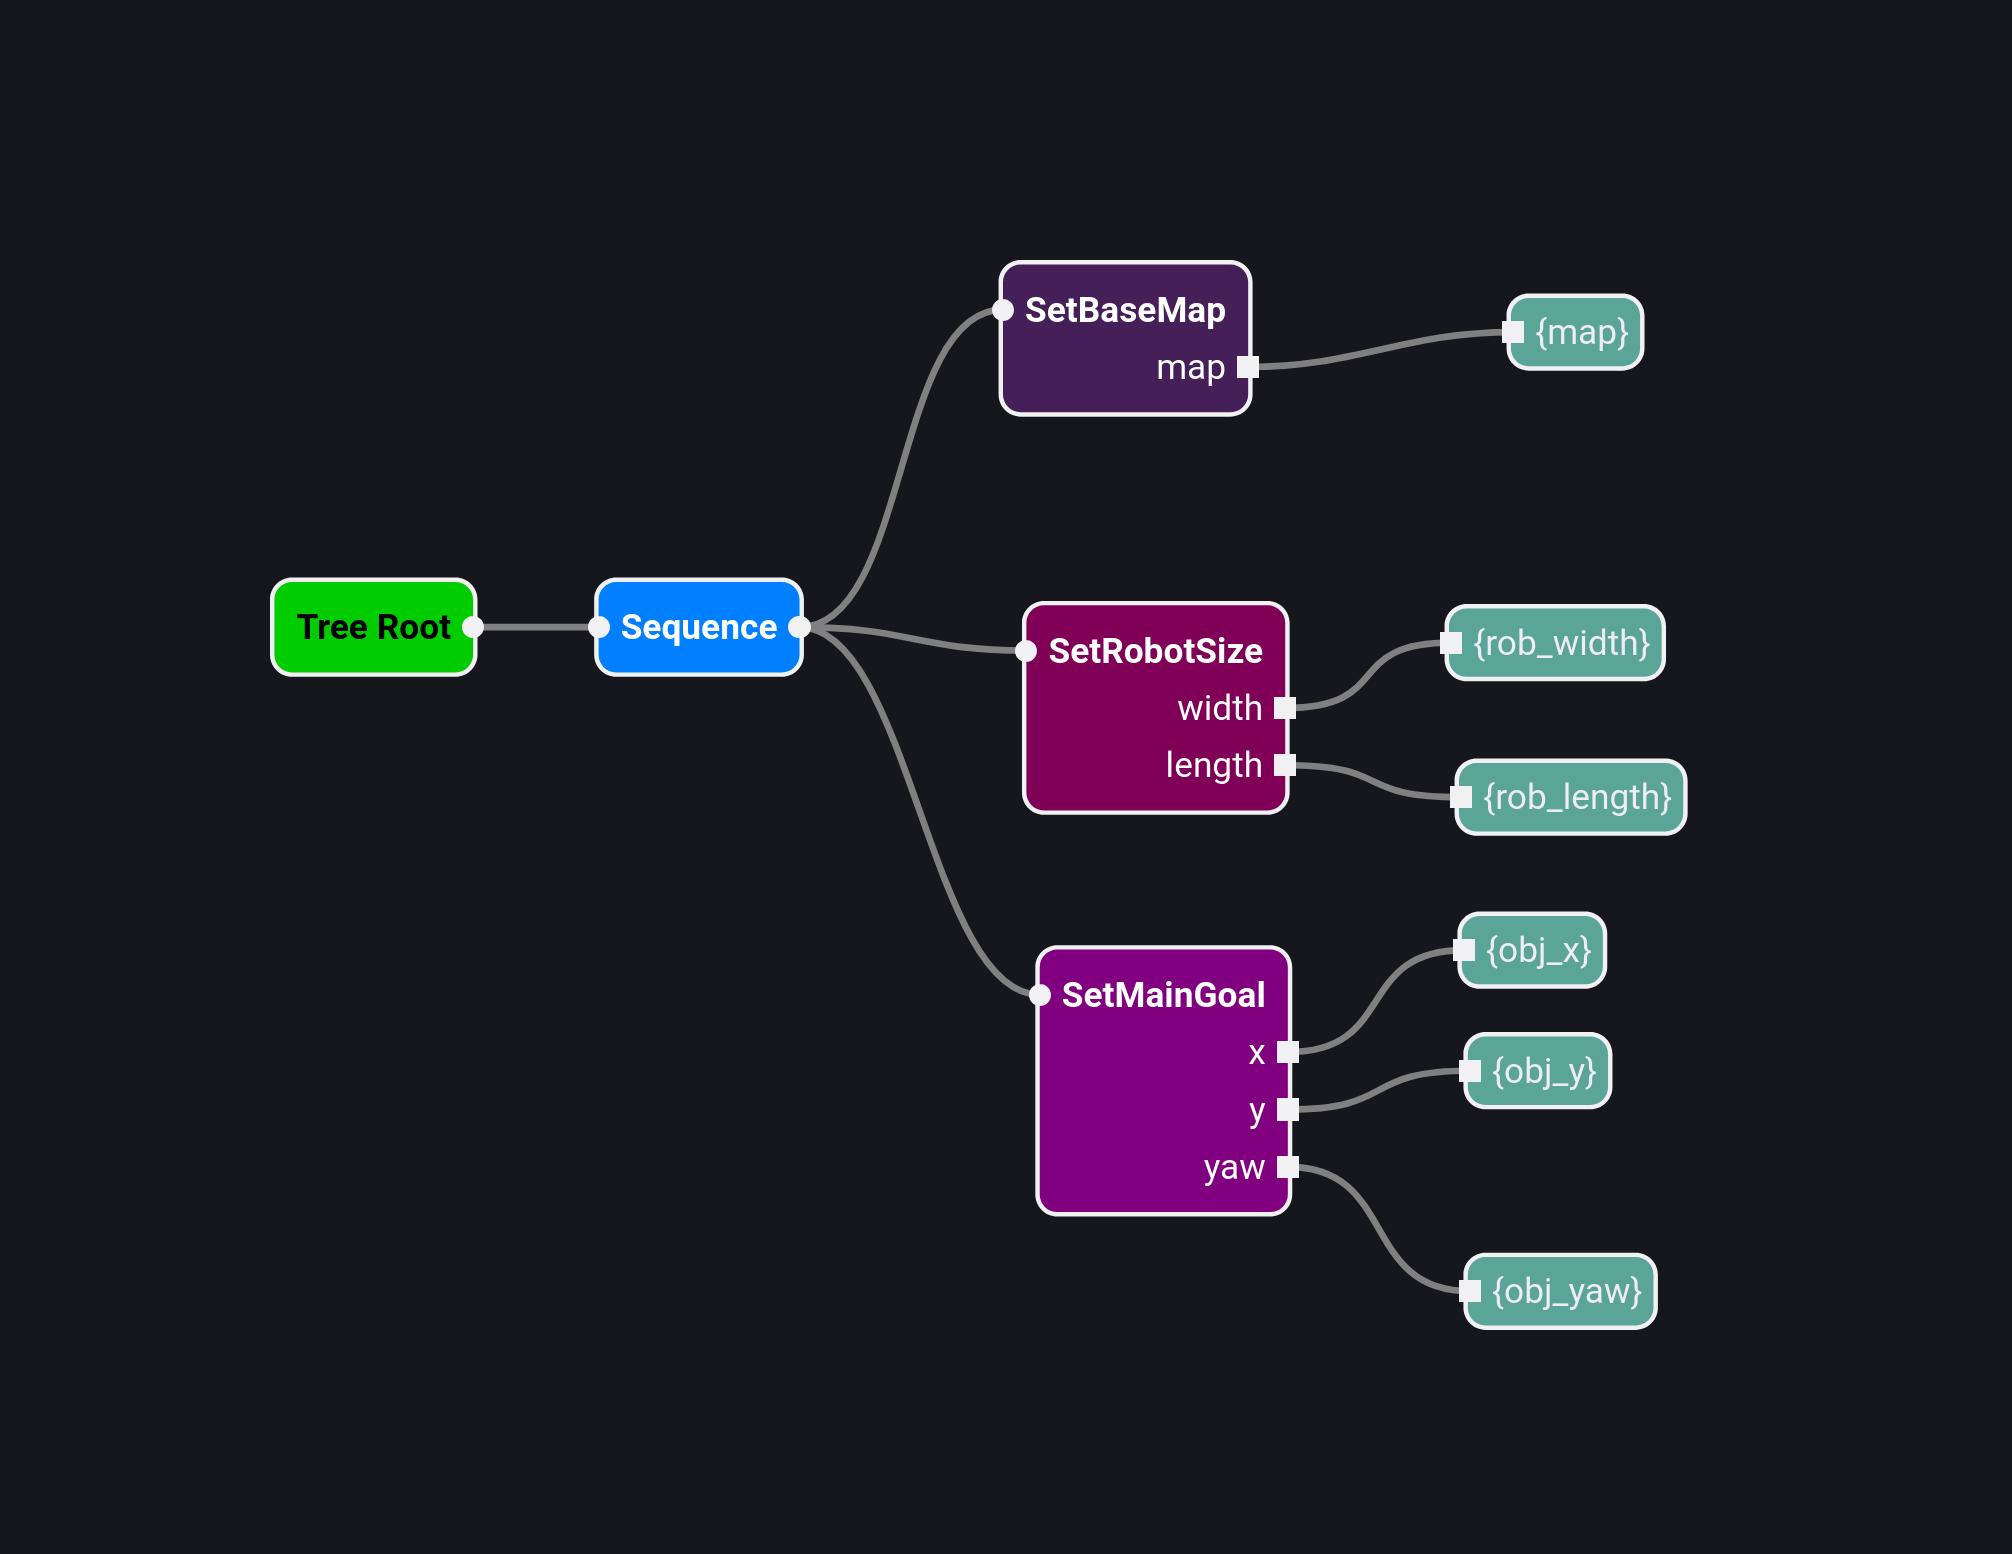
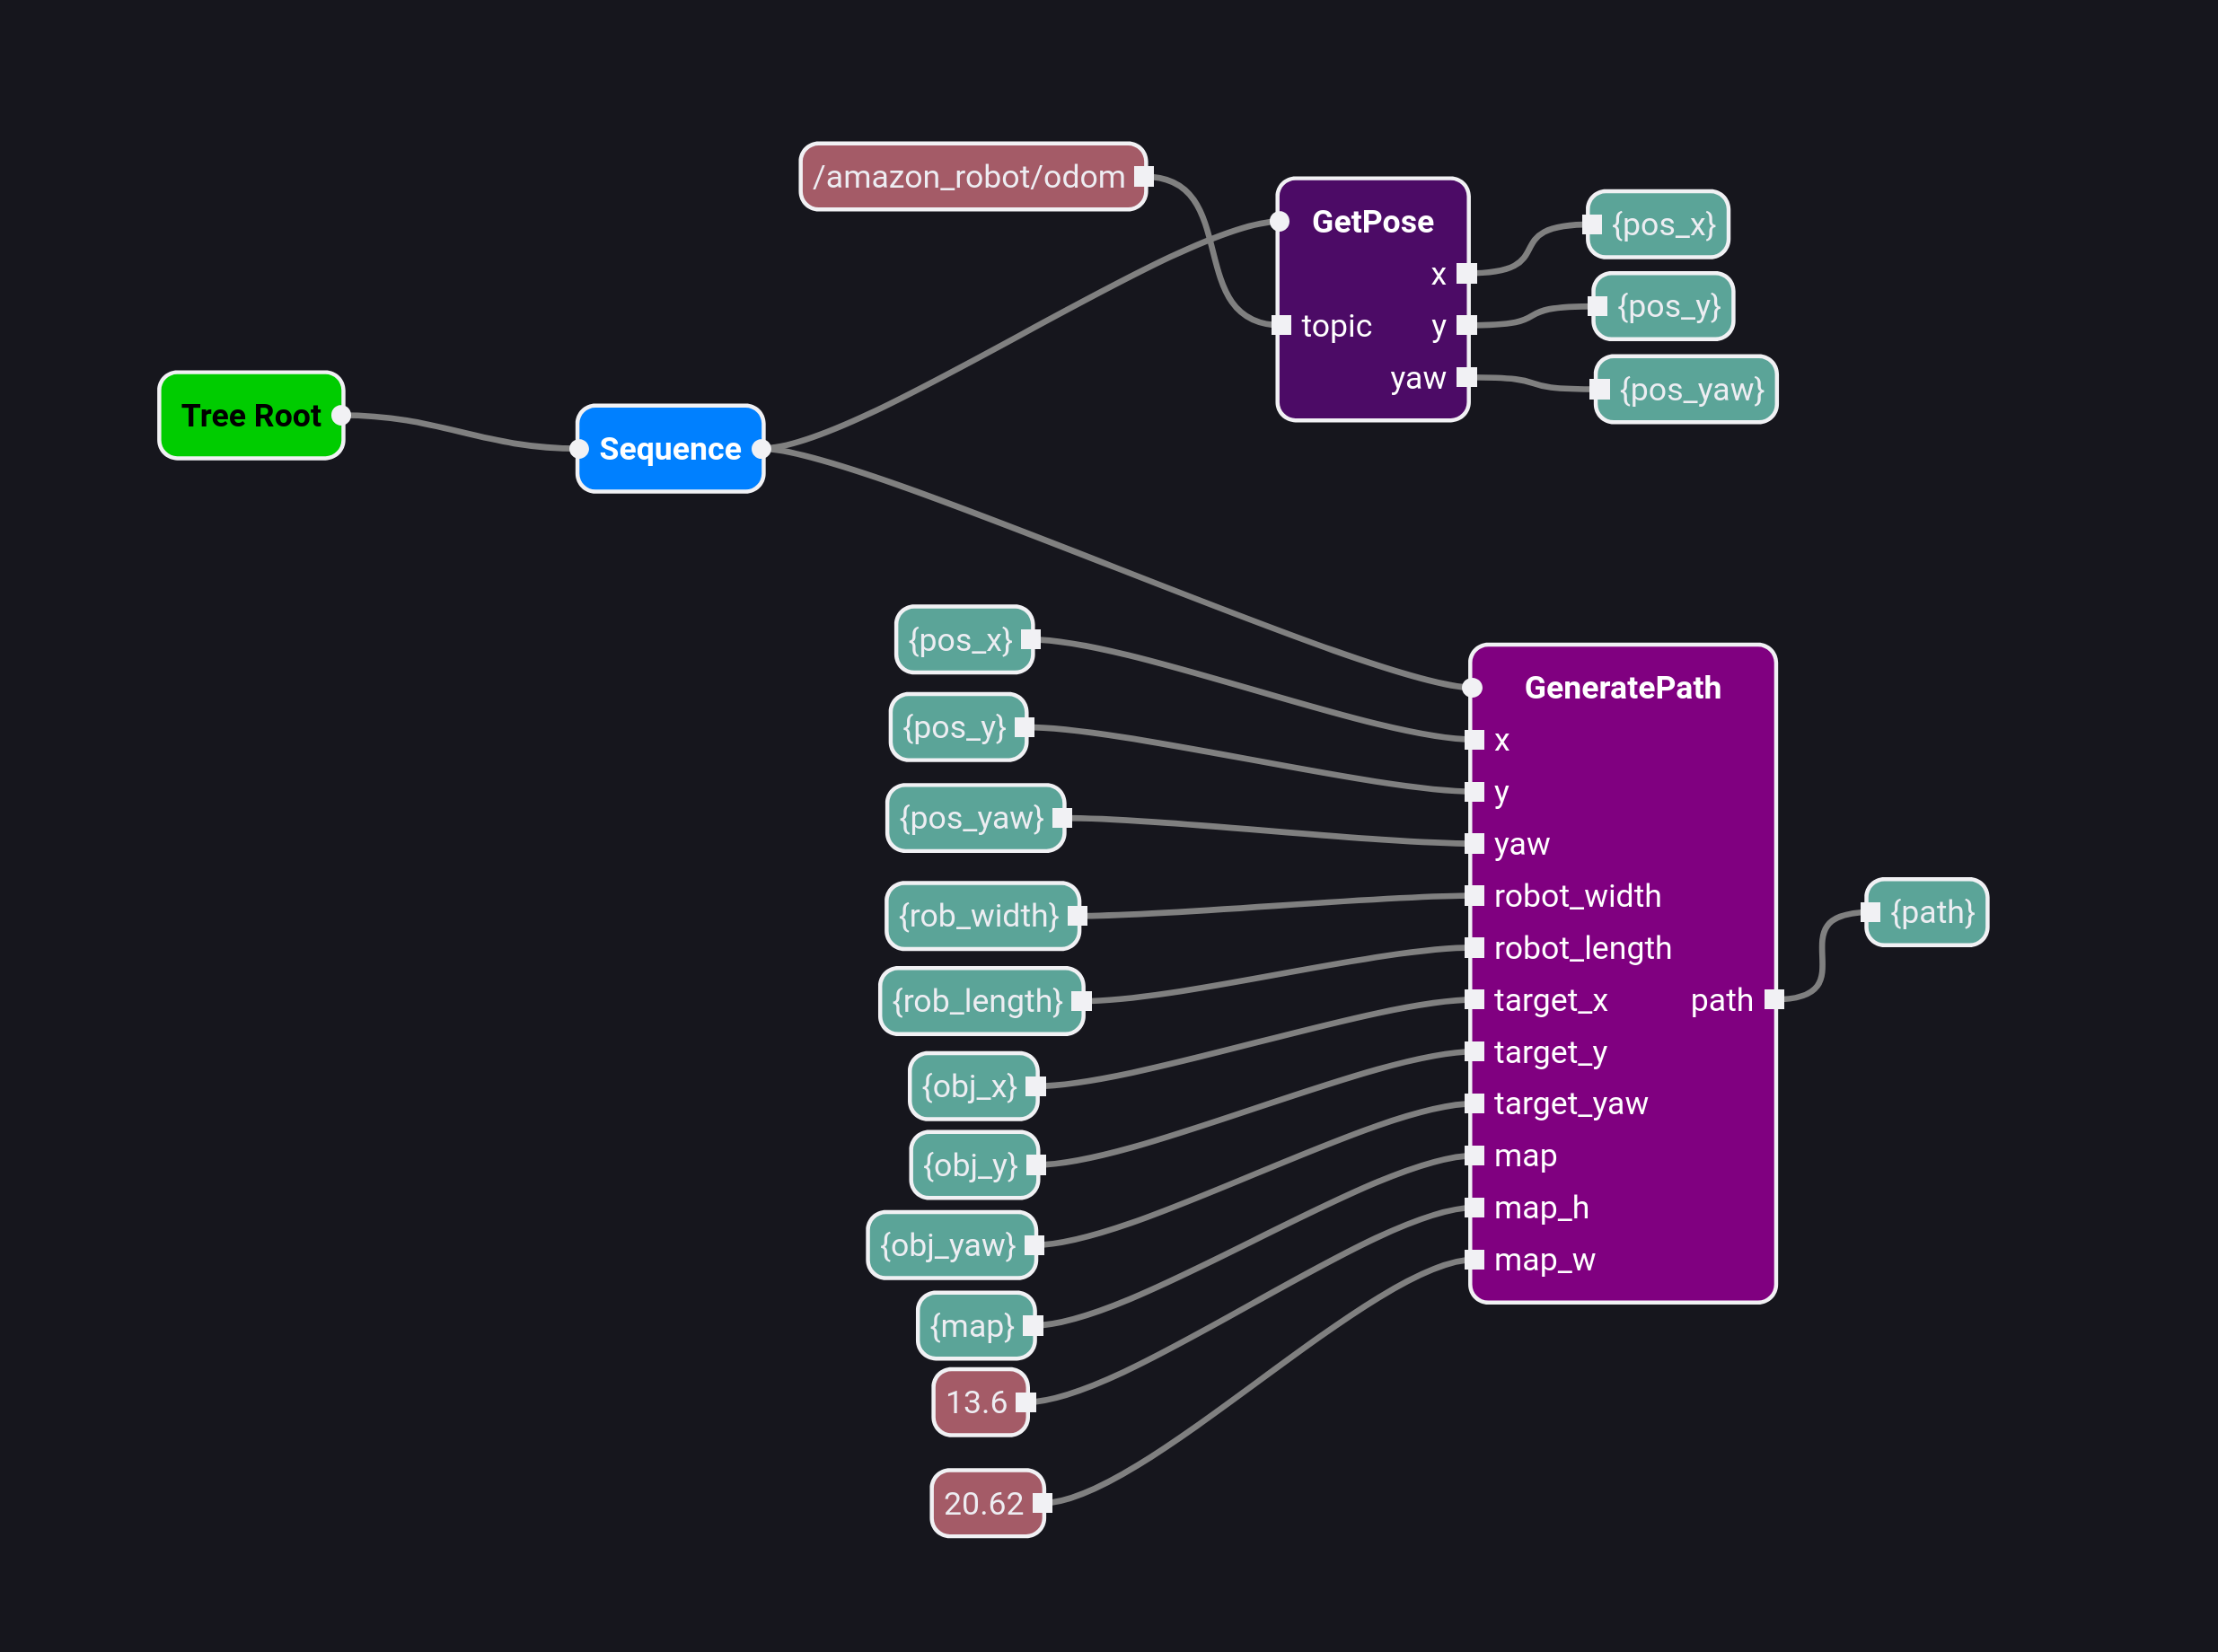
- SetBaseMap: loads the base map and sets it for use in the path generation.
- SetMainGoal: sets the goal for use in the path generation.
- SetRobotSize: sets the robot size for use in the path generation.
- LoadShelf: picks up the shelf and sets the new robot geometry, goal and map.
- GeneratePath: generates a path given a map and a goal using Ompl.
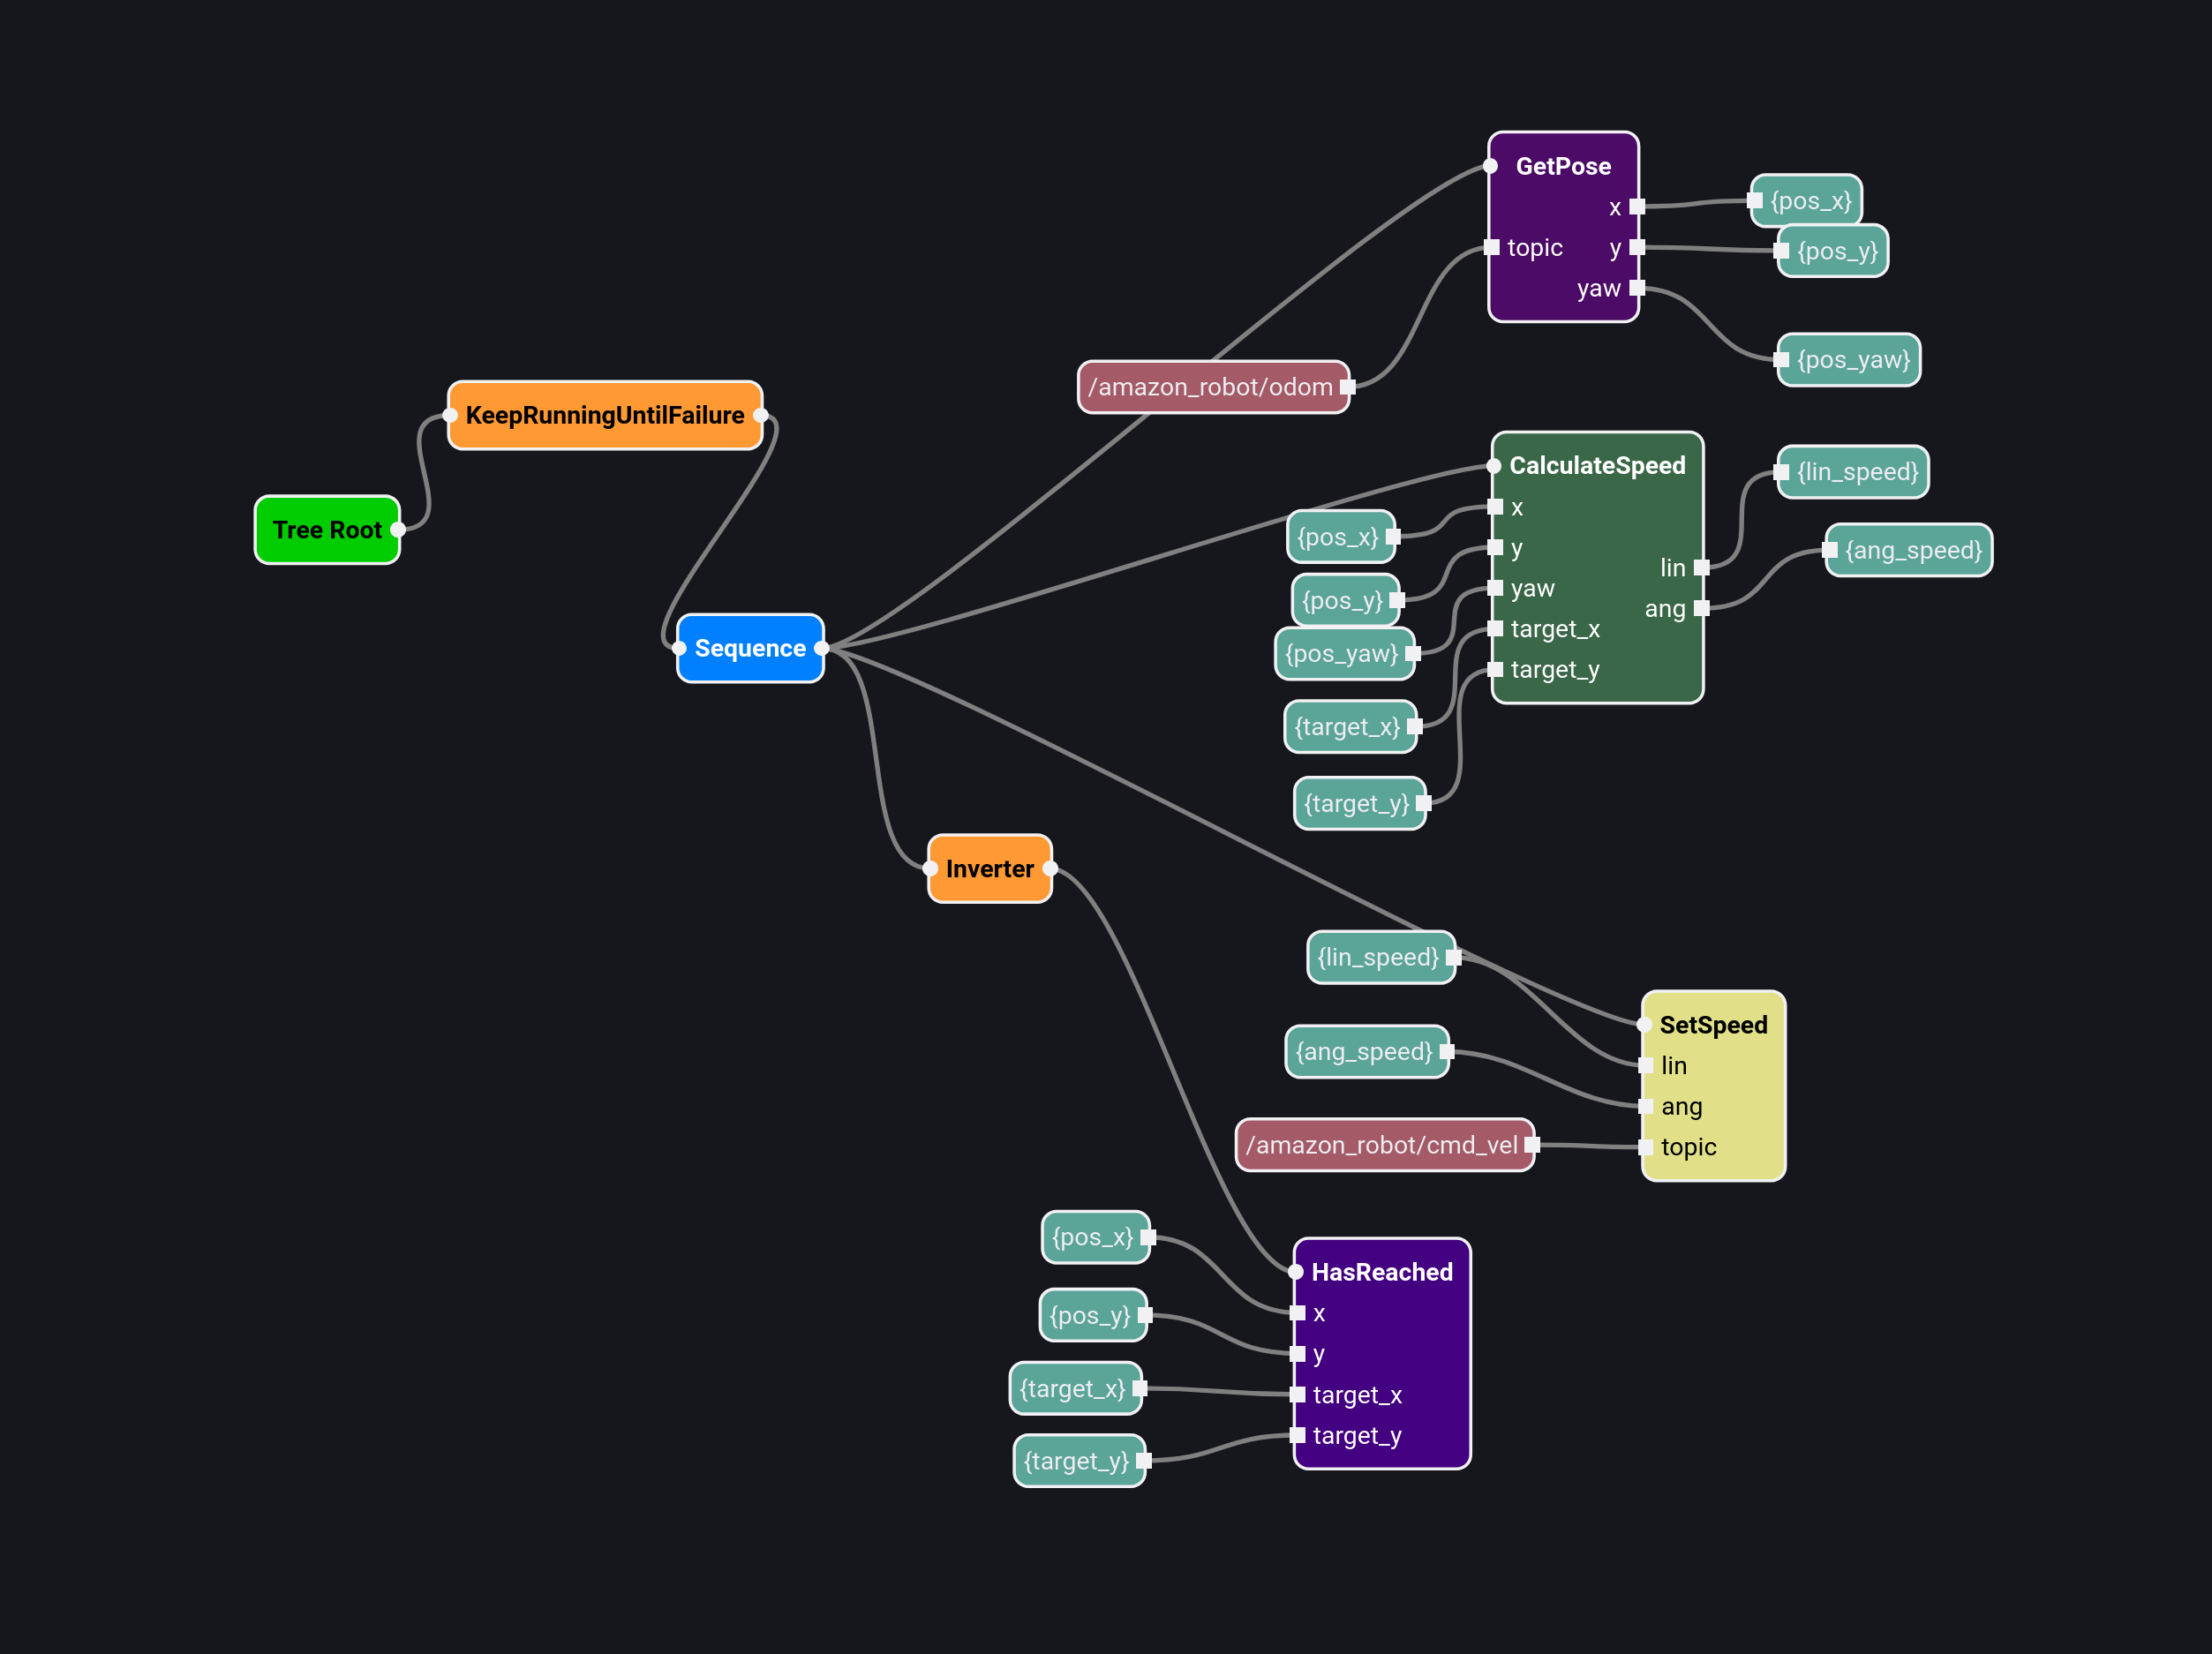
- CalculateSpeed: calculates the speed to reach the goal.
- GetPose: gets the pose of the robot and sets it to the blackboard.
- HasReached: returns failure if the robot is not close to the target. Returns success otherwise.
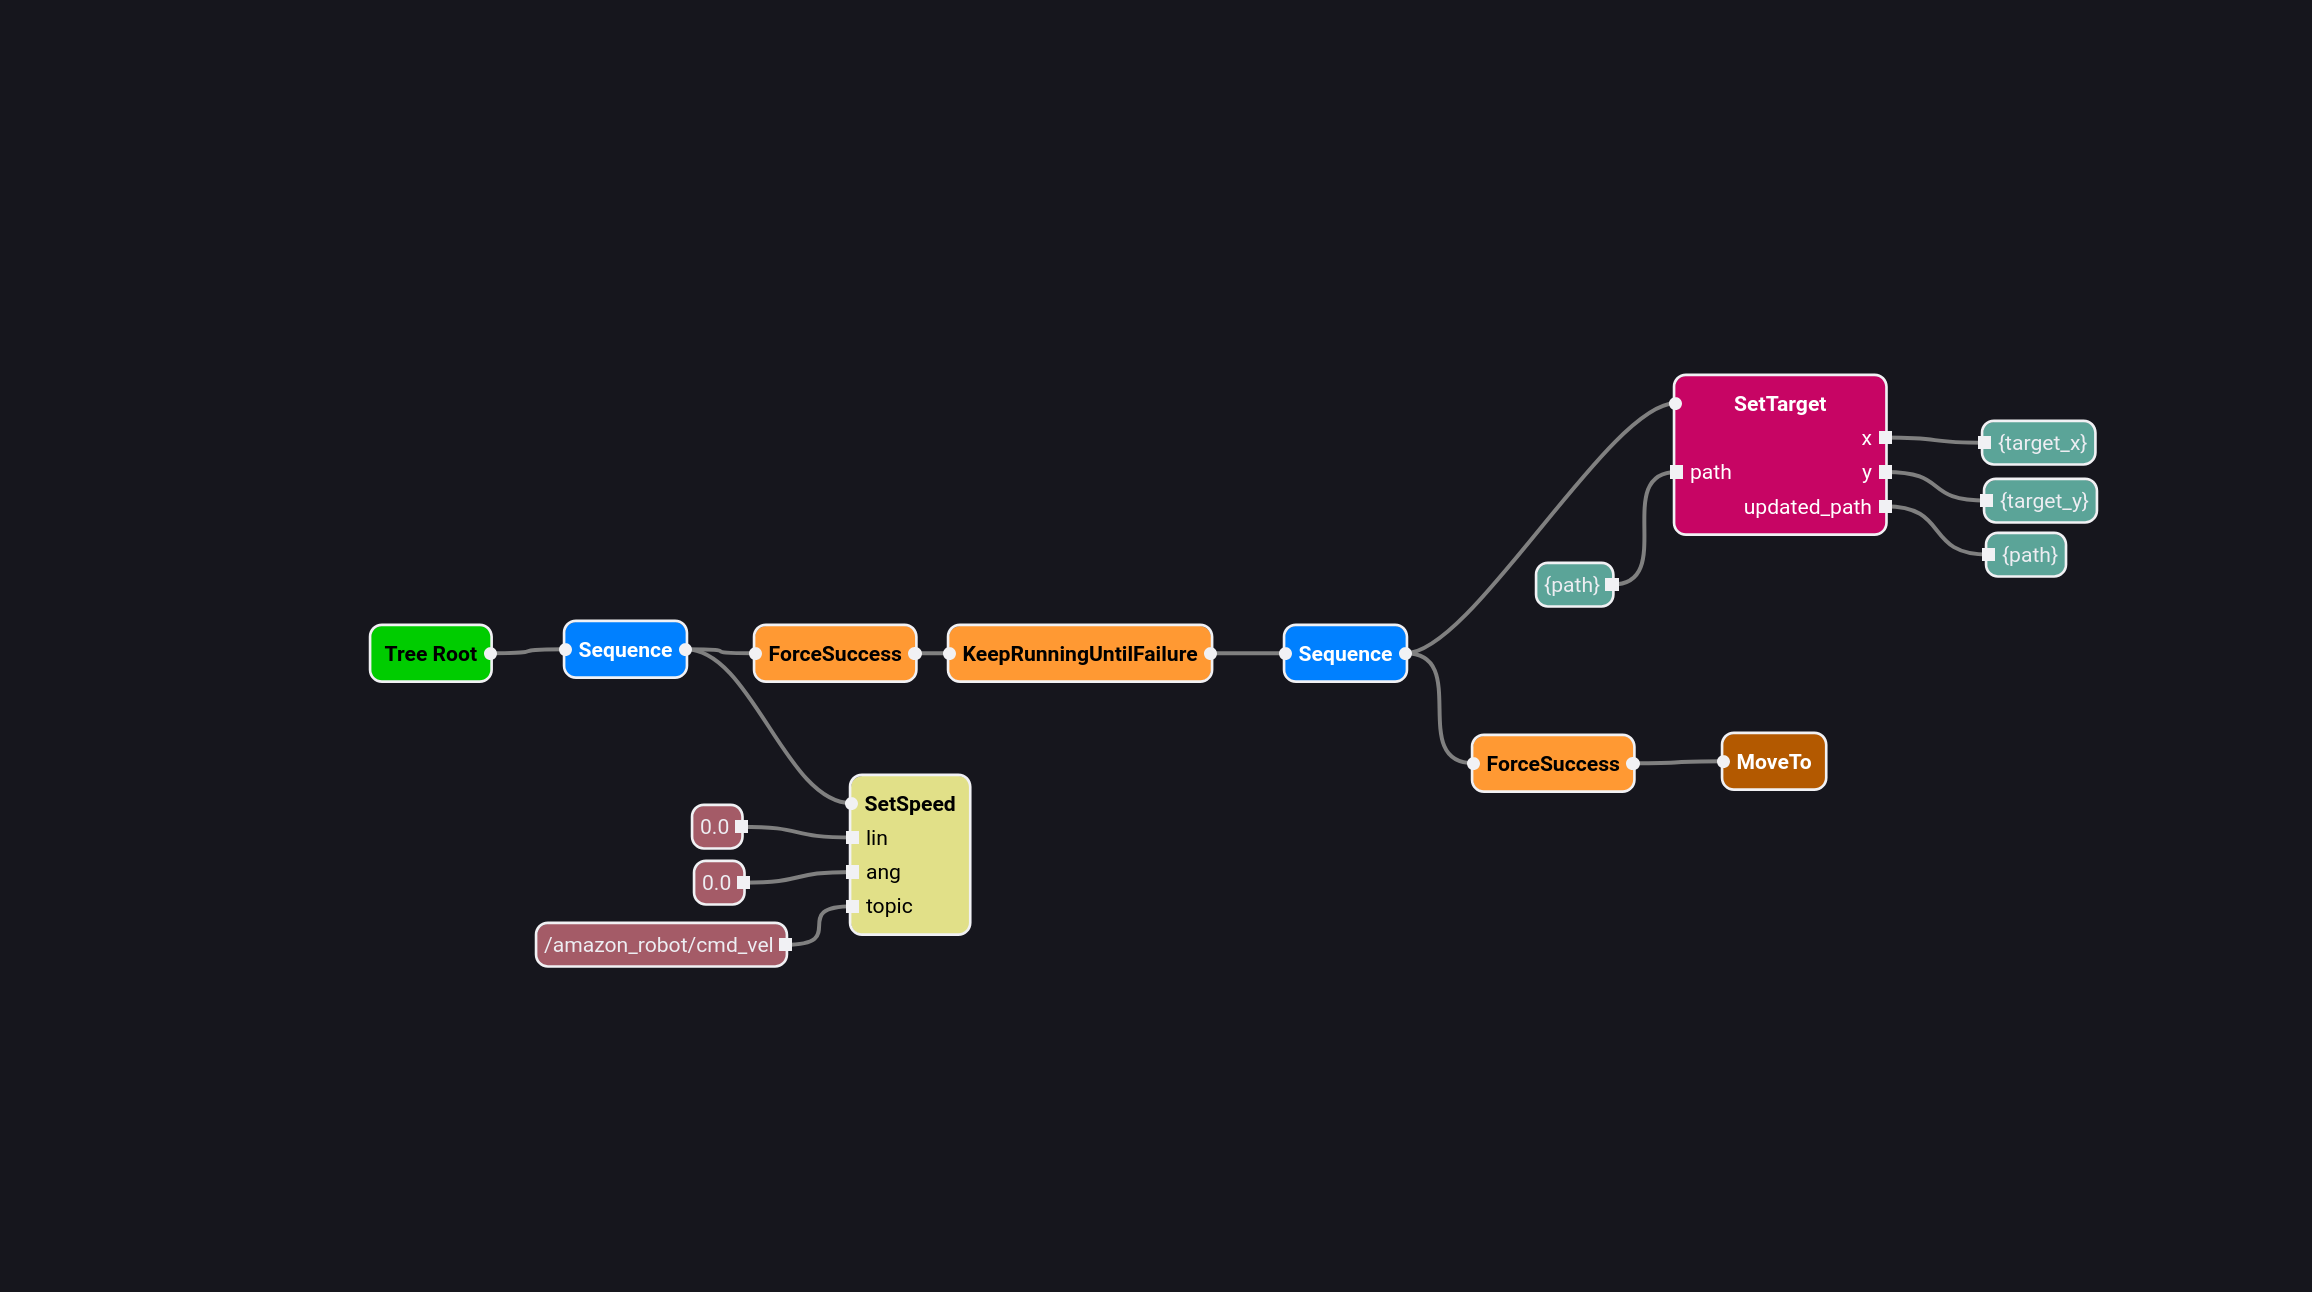
- SetSpeed: reads the linear and angular speed from CalculateSpeed and sends it to the car using the topic passed to the action (/amazon_robot/cmd_vel).
- SetTarget: sets the target for the speed calculations using the path generated.
For the subtrees I created 3 different ones:
- Planning: responsible for the path generation.
- FollowPath: responsible for following the path generated. Contains the subtree MoveTo.
- MoveTo: responsible for the movement to a point.
New standard library entries
Using the subtrees from the Warehouse demo as the base I added 4 new entries to the standard library:
SetPlanData
Used for setting the data necessary, such as the map, robot size and goal for the OmplPlanning subtree. Normally used together with OmplPlanning.
OmplPlanning
Used for generating a path from the robot position to the goal using Ompl. Normally used together with SetPlanData for setting the needed map, robot size and goal.
FollowPath
Used for following a given path in the simulator coordinates. Contains the subtree MoveTo.
MoveTo
Used for moving the robot to a given point.
Global Navigation Demo
The goal of this demo was to showcase that only using subtrees from the standard library used for another project (Warehouse demo) it was possible to create a working application.
For that purpose I solved nother exercise from Robotics Academy, called Global Navigation, using only Behavior Trees from the standard library in a sequence. The universe used is the same as the one in Robotics Academy, City Large.
The subtrees used in this demo were the 4 new additions to the standard library explained above.
The only changes needed was to change the map path inside the SetBaseMap action, decrease the robot size, change the goal coordinates, increase the speed of the robot (as the map is 30x larger the speed was increased by that amount) and adapt the map to simulator translation of the coordinates inside GeneratePath to adjust it to the rotation of the world 180º.
For that last part the code changes were the following:
worldx = x / self.h_scale - self.room_h / 2
worldy = y / self.w_scale - self.room_w / 2
To
worldx = self.room_h / 2 - x / self.h_scale
worldy = self.room_w / 2 - y / self.w_scale