Week 9: July 28 ~ Aug 03
Preliminaries
During this week, we focused on the challenge of integrating ONNX model support within the RoboticsAcademy Docker Image (RADI). We explored ways to reliably load and run ONNX models using PyTorch, targeting GPU acceleration. This required analyzing the compatibility of available tools, identifying runtime issues, and designing a solution that is both stable and lightweight.
Additionally, this includes the evaluation of the performance of Deep Learning models in the Follow-Line Exercise.
Objectives
- ONNX Model Testing and Debugging Using onnx2pytorch (last week solution).
- Multiple solutions were evaluated to ensure stable and robust GPU acceleration within RADI.
- Install PyTorch with CUDA support inside the container and verify its functionality.
- Testing Line-Following Performance with four Deep Learning models.
Execution
🏷️ ONNX Model Testing and Debugging Using onnx2pytorch
In Week 08 , I enabled GPU acceleration in the RoboticsAcademy Docker Image (RADI) using the onnx2pytorch package. Our ultimate goal is to provide stable and robust GPU acceleration within RADI, which will support deep learning-based exercises such as Human Detection , Digit Classification , and end-to-end visual control of an autonomous vehicle.
To move toward this objective, I loaded existing
Open Neural Network Exchange (ONNX)
models using the
onnx2pytorch
package, which we began integrating last week. In
general, the models loaded successfully, though some
emitted
non-critical warnings
that appear to be ignorable.
However, we also encountered a few compatibility issues during testing. These issues may impact the reliability and portability of the solution and need to be addressed before full integration. Below are some of the problems we identified:
Ignorable warnings:

Unsupported Ops:
While testing the ONNX model using the onnx2pytorch package, which converts ONNX models to PyTorch, I encountered the following error:
Conversion not implemented for op_type=If
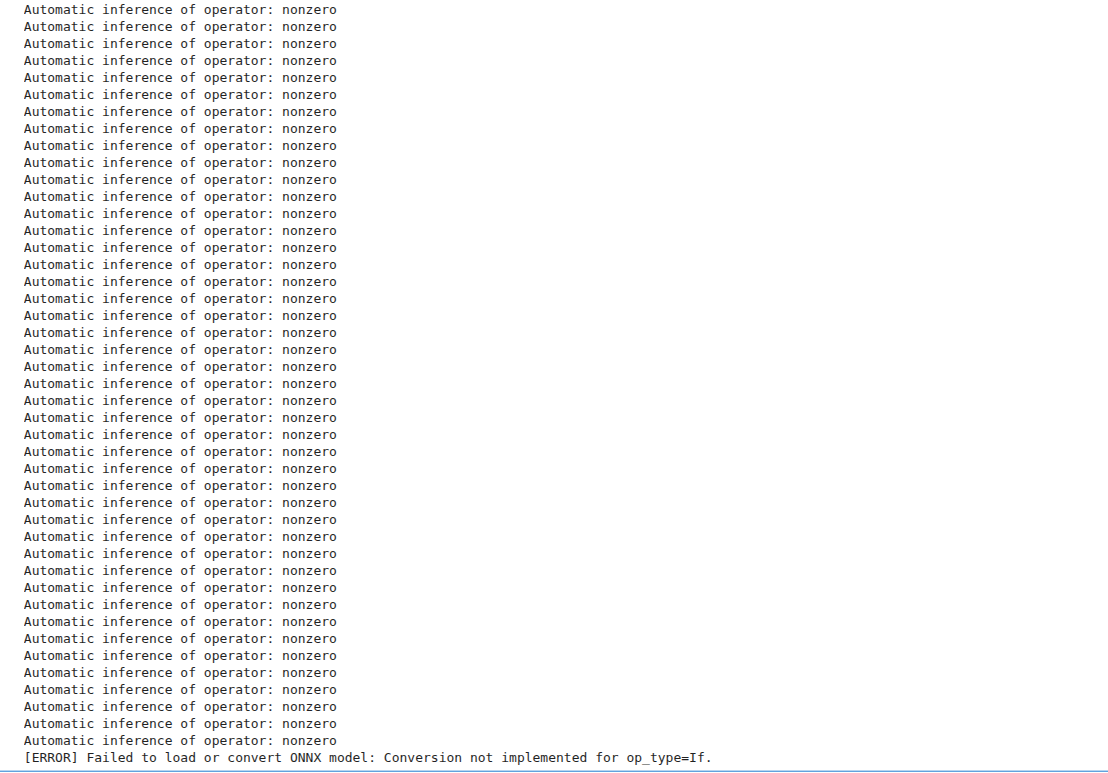
The op_type=If issue reflects a common
tension between static vs. dynamic computation
graphs. ONNX sits somewhere in the middle, and while
ONNX Runtime handles both, conversion to PyTorch (a
mostly static graph approach with
nn.Module ) can't easily translate
conditional paths.
Summary: Issue with onnx2pytorch Package
We initially attempted to convert ONNX models to
PyTorch
using the onnx2pytorch library. While
it worked with basic models, it failed to load our
custom ONNX model, likely due to
unsupported operators or internal conversion bugs.
- Observed exceptions and incorrect graph parsing.
-
Realized
onnx2pytorchlacks full support for complex or dynamic ONNX graphs. - This prompted us to seek a more stable and production-ready alternative.
🏷️ Moving to a stable and robust solution
After encountering stability and robustness issues with the onnx2pytorch solution, we sought a more stable and reliable alternative.
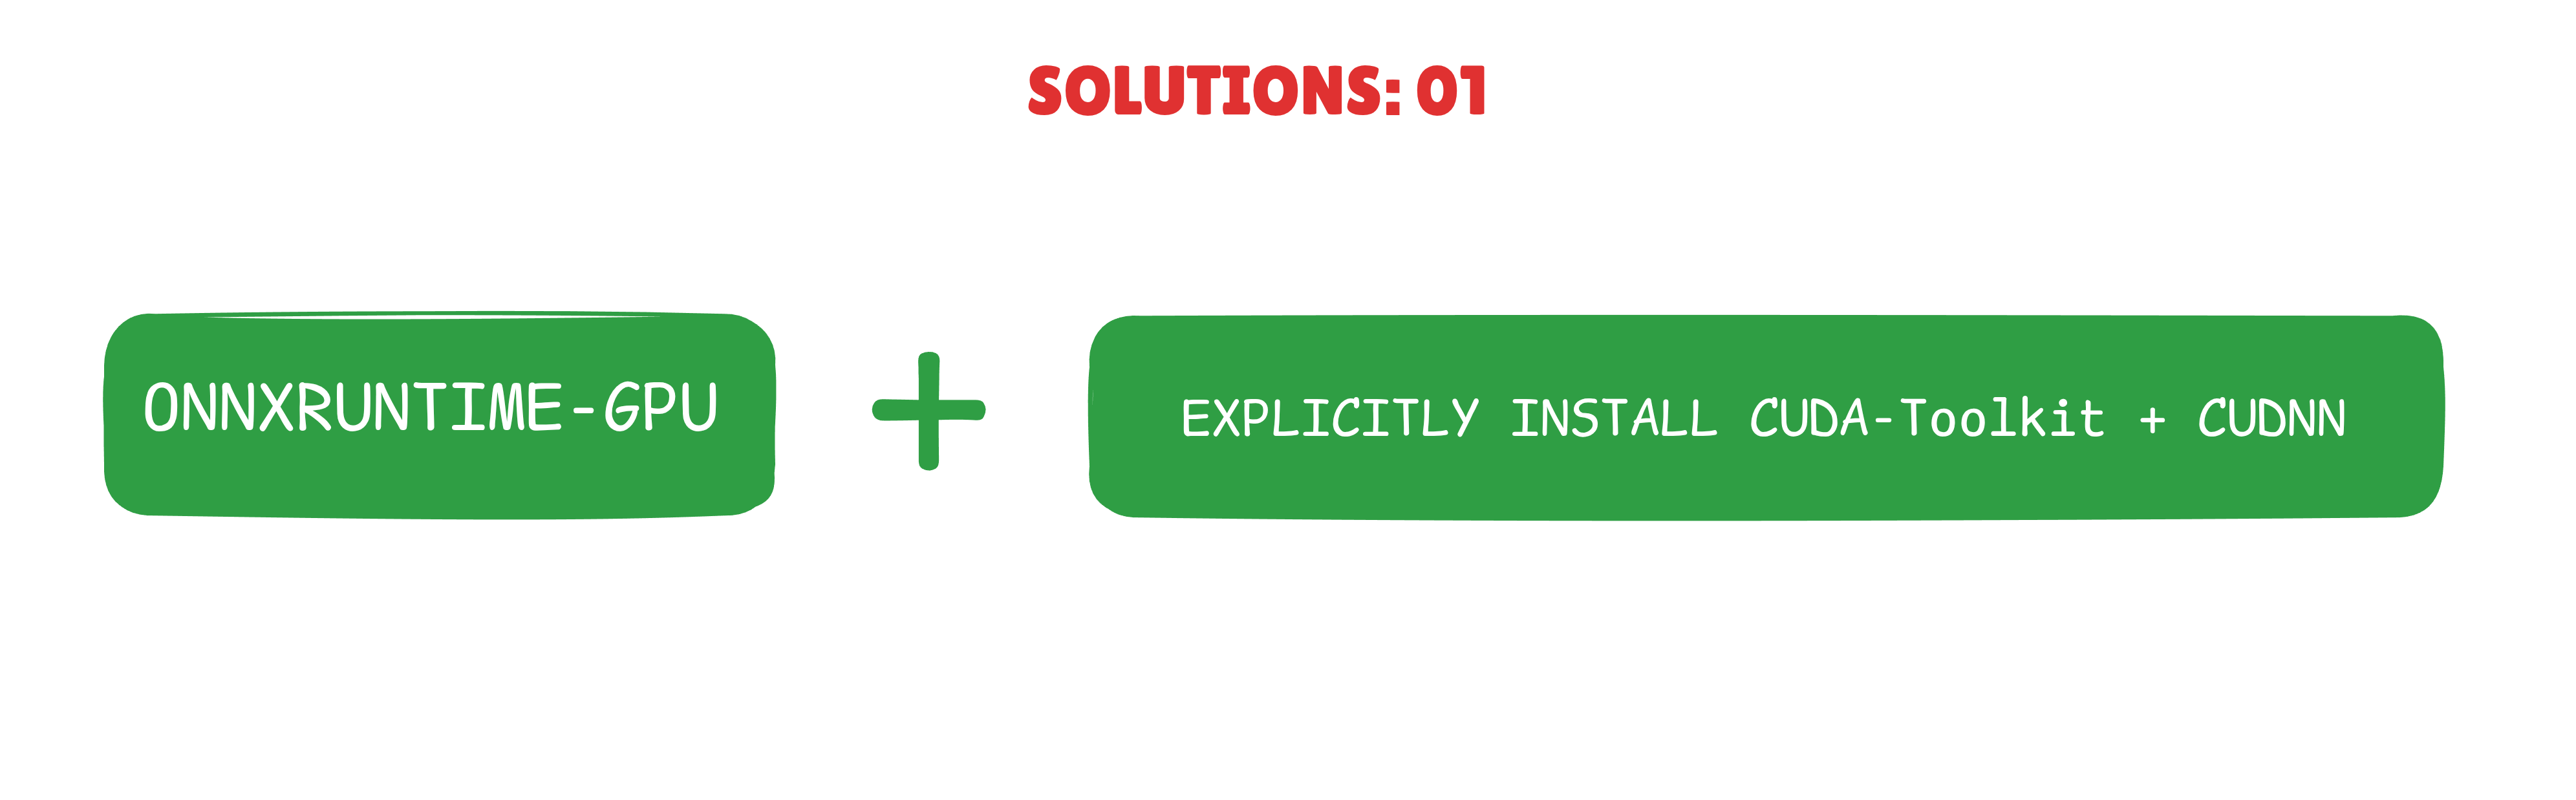 Solution 01
 Solution 02
✅ Solution 01: onnxruntime-gpu + CUDA-Toolkit/cuDNN Stack
This approach involved:
- Installing onnxruntime-gpu in the RADI container.
- Manually installing CUDA Toolkit and cuDNN inside the Docker image to enable GPU support.
Pros: Direct ONNX model inference on GPU with onnxruntime
Cons:
- Large image size due to full CUDA/cuDNN installation.
- Dependency management becomes more complex.
- Limited flexibility in chaining with PyTorch-based workflows.
- Dependency conflicts arose, affecting compatibility with other components.
After testing, this solution proved too heavy and complex to maintain within the lightweight scope of RADI.
✅ Solution 02: onnxruntime-gpu + PyTorch with CUDA Support (Preferred)
This solution uses:
- onnxruntime-gpu for ONNX inference.
- PyTorch with CUDA support installed in RADI to allow flexible DL model operations.
Why we chose this:
- Leverages PyTorch for any extra processing or hybrid pipelines.
- Smaller image size than full CUDA install.
- Easier to maintain and debug.
- Verified compatibility with existing DL exercises and Docker infrastructure.
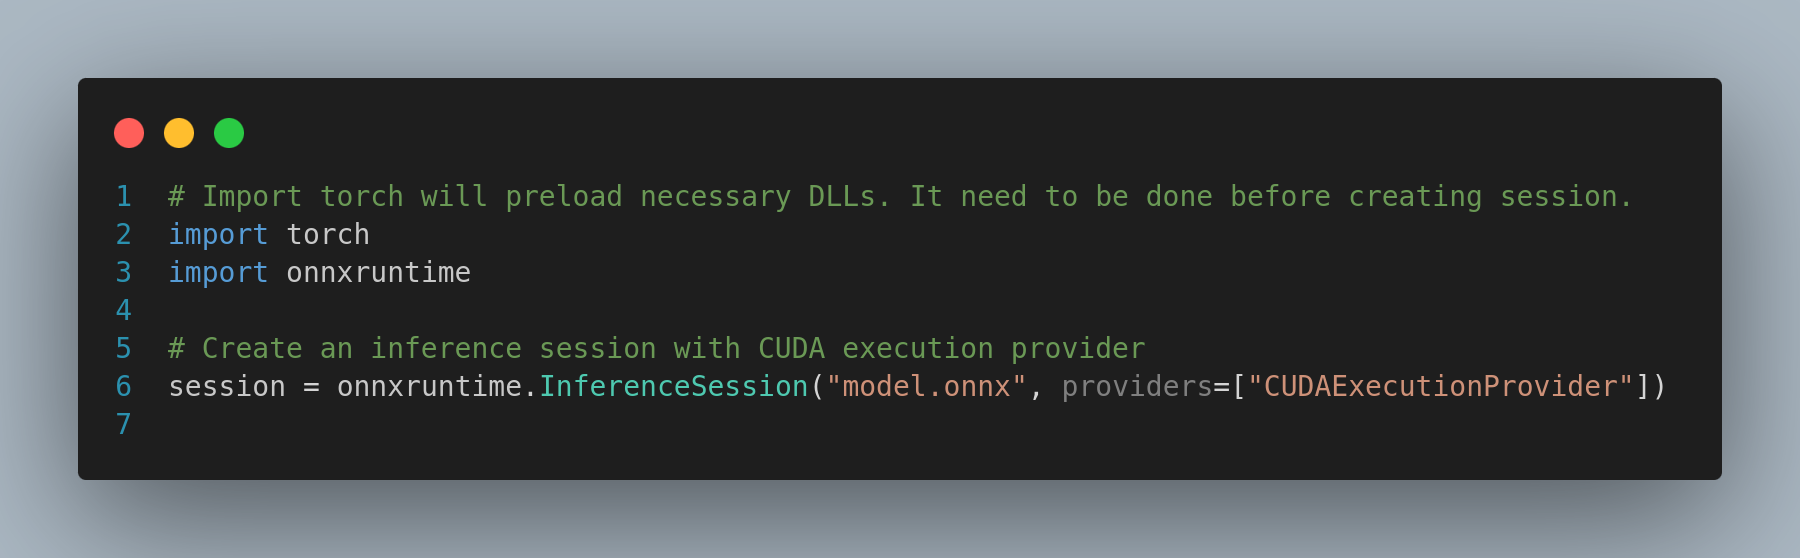
🏷️ Using ONNX Runtime GPU with PyTorch and CUDA Support for Accelerated Inference (Solution 02: Preferred Setup)
The onnxruntime-gpu package is designed to work seamlessly with PyTorch, provided both are built against the same major version of CUDA and cuDNN. When installing PyTorch with CUDA support, the necessary CUDA and cuDNN DLLs are included, eliminating the need for separate installations of the CUDA toolkit or cuDNN.
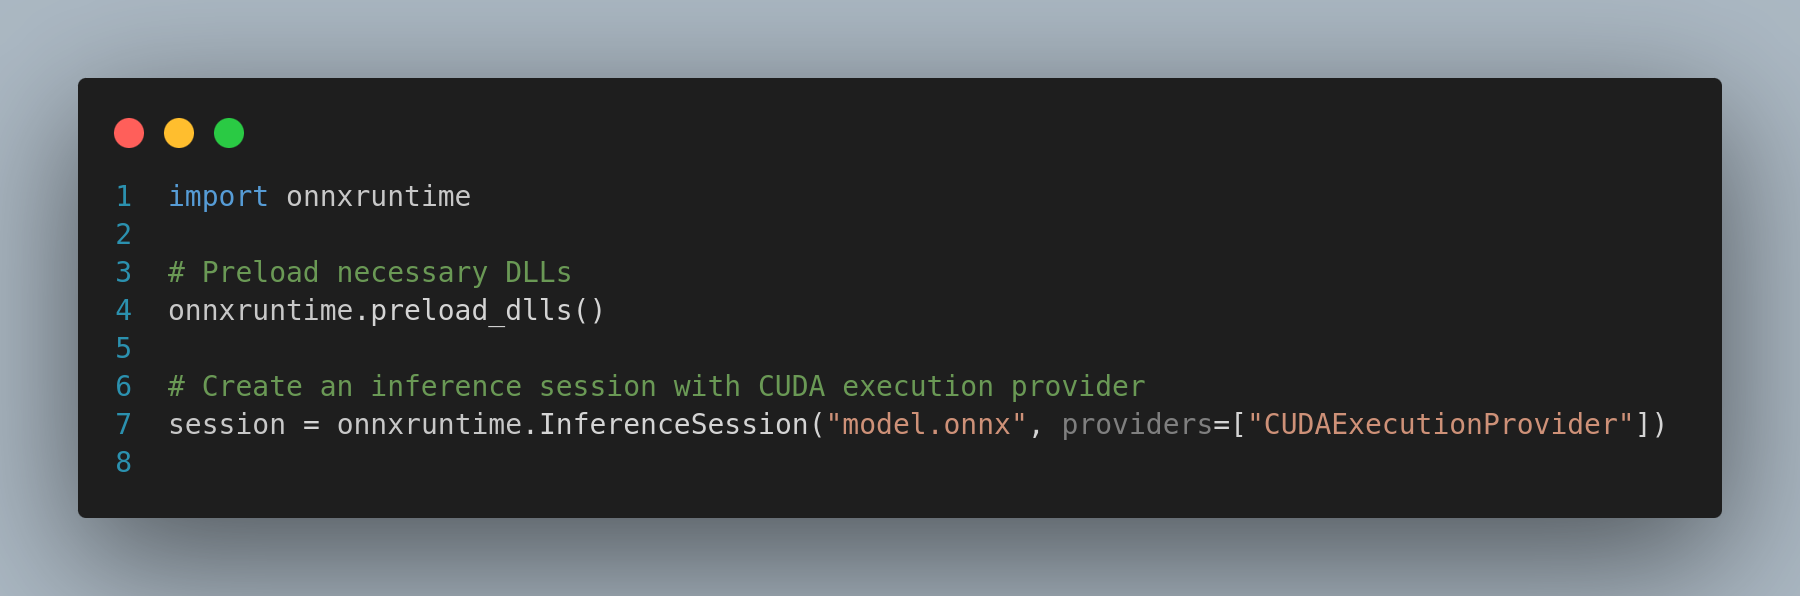
To ensure ONNX Runtime utilizes the DLLs installed
by PyTorch, you can preload these libraries before
creating an inference session. This can be achieved
by either importing PyTorch or by using the
onnxruntime.preload_dlls() function.
Example 1: Importing PyTorch
Example 2: Using preload_dlls Function
🏷️ Validation of ONNXRuntime-GPU and PyTorch with CUDA Support
To verify that the ONNX Runtime is using the correct CUDA and cuDNN libraries, you can check the environment variables or use the ONNX Runtime API to print the provider information. Some ways to verify:
1. Verify PyTorch Has CUDA Support:
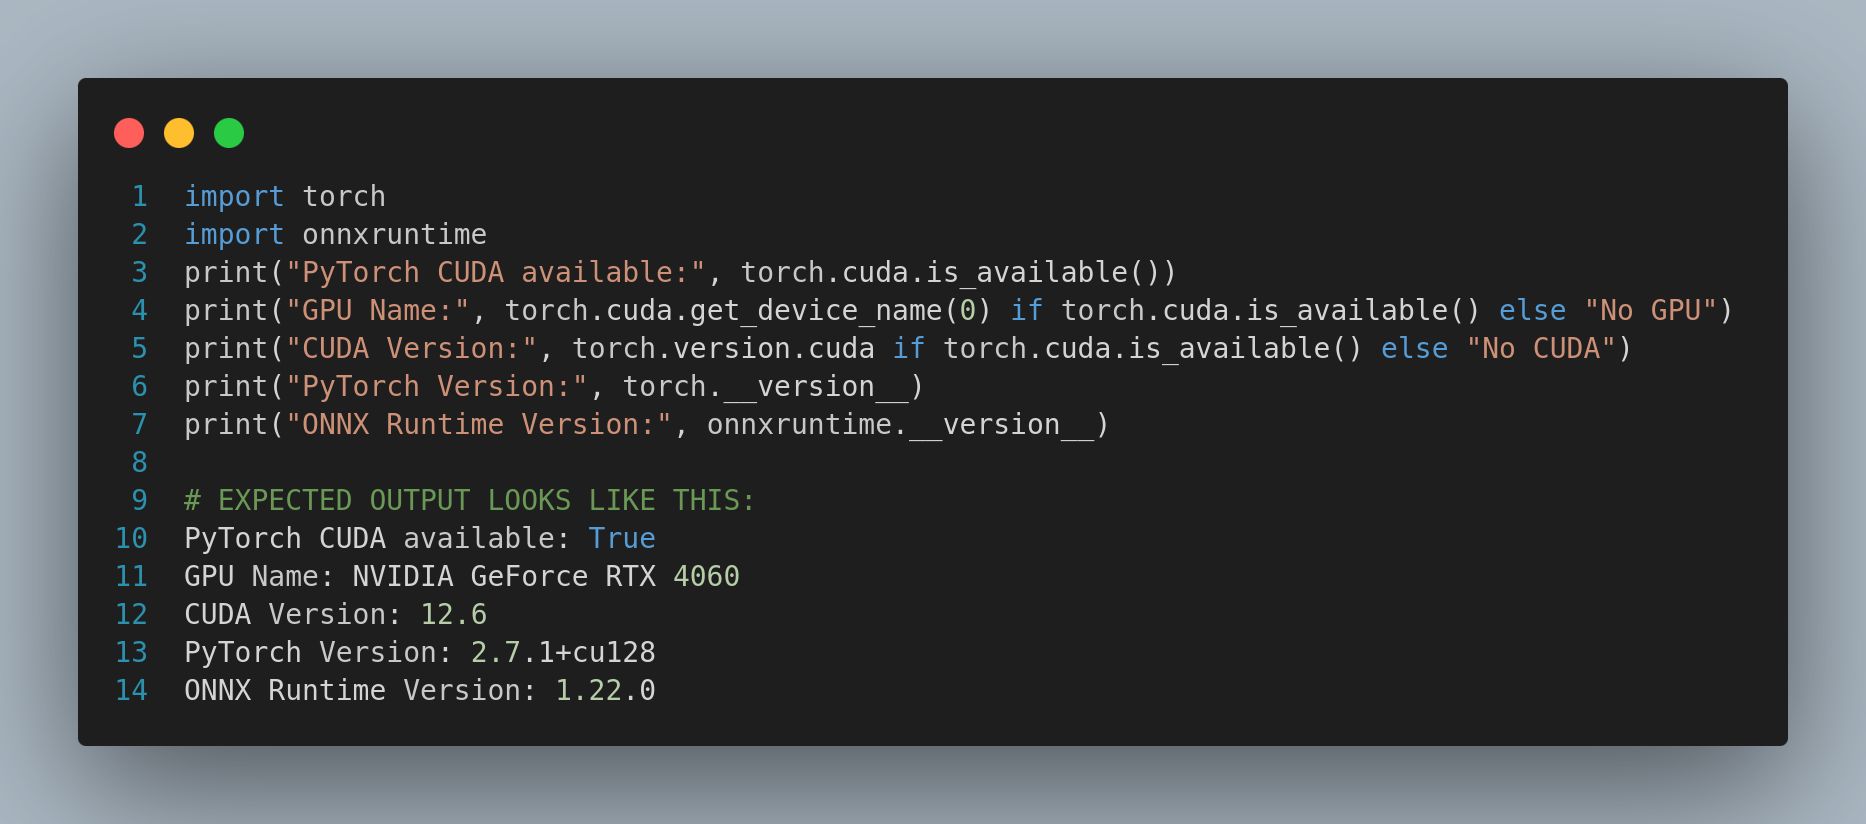
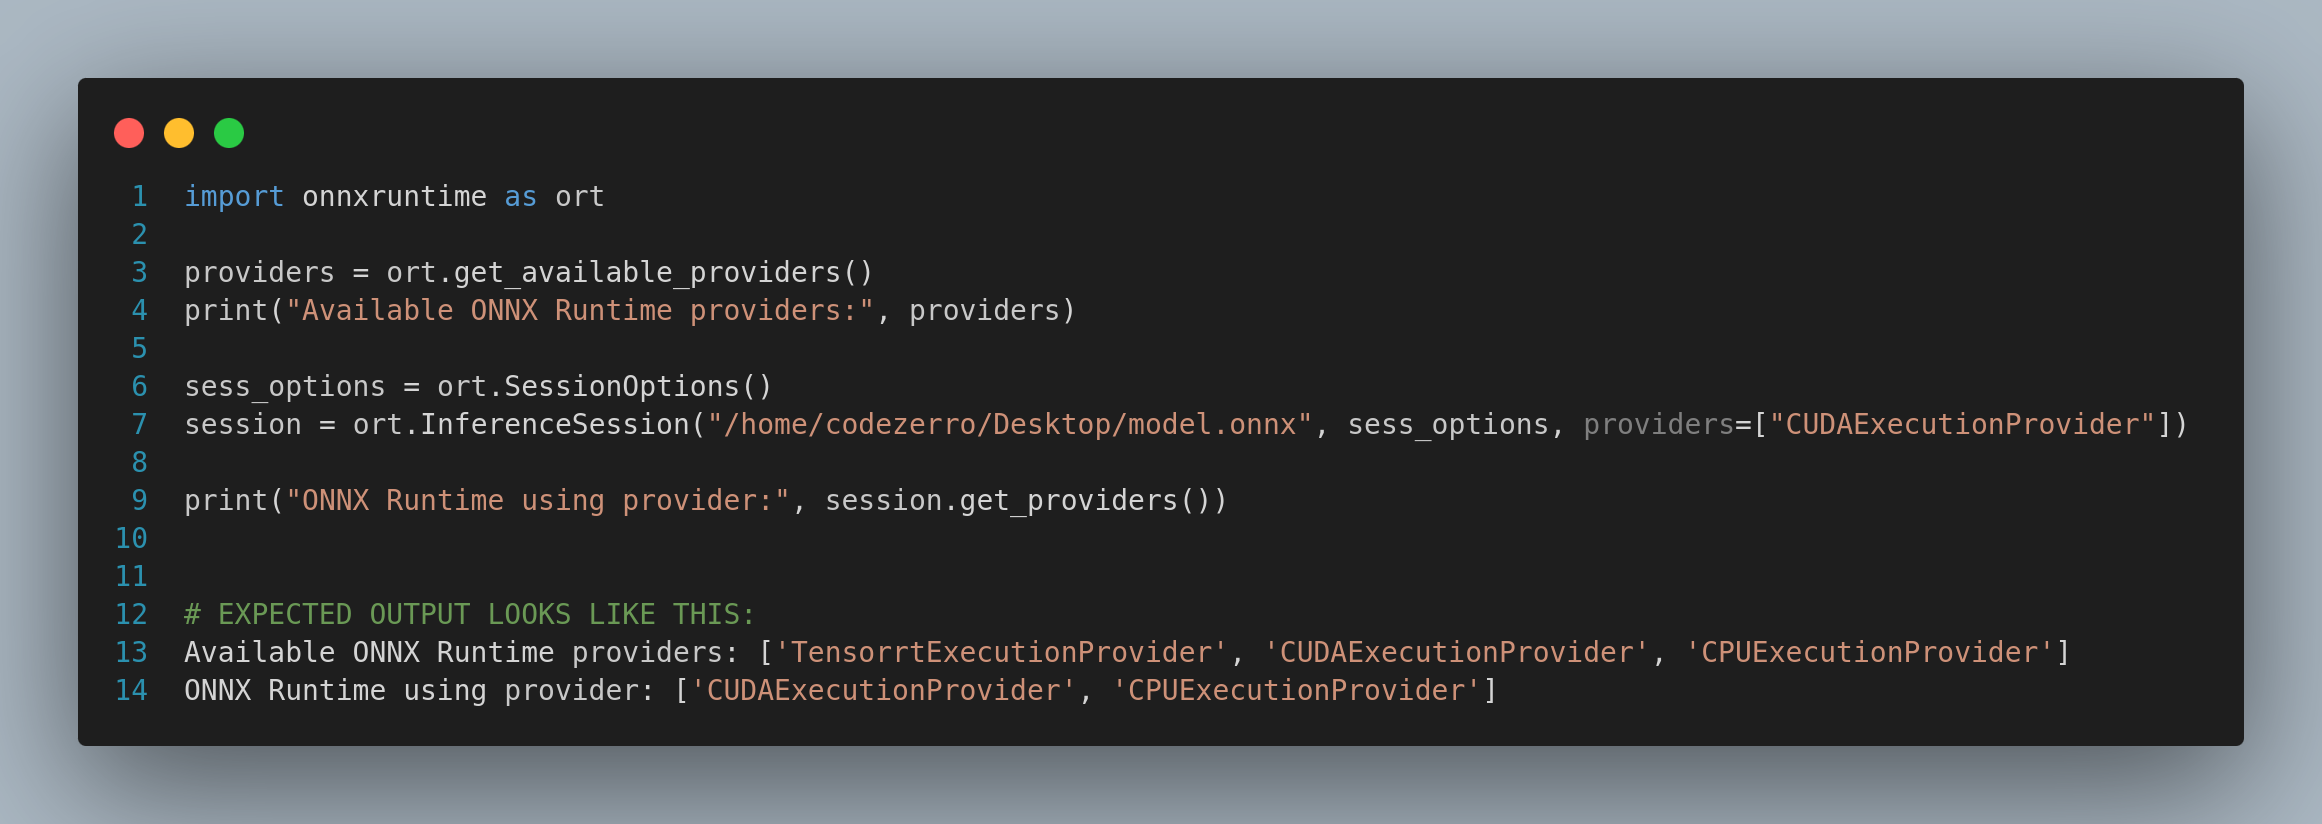
2. Verify ONNX Runtime Uses GPU
3. Monitoring GPU Usages
watch nvidia-smi

4. Compare Speed (CPU vs GPU)
After verifying the versions and confirming CUDA availability, I processed 17,862 follow-line exercise images using both CPU and GPU modes.I copied all the images and the Python script inside the RADI container. The performance difference is shown below:
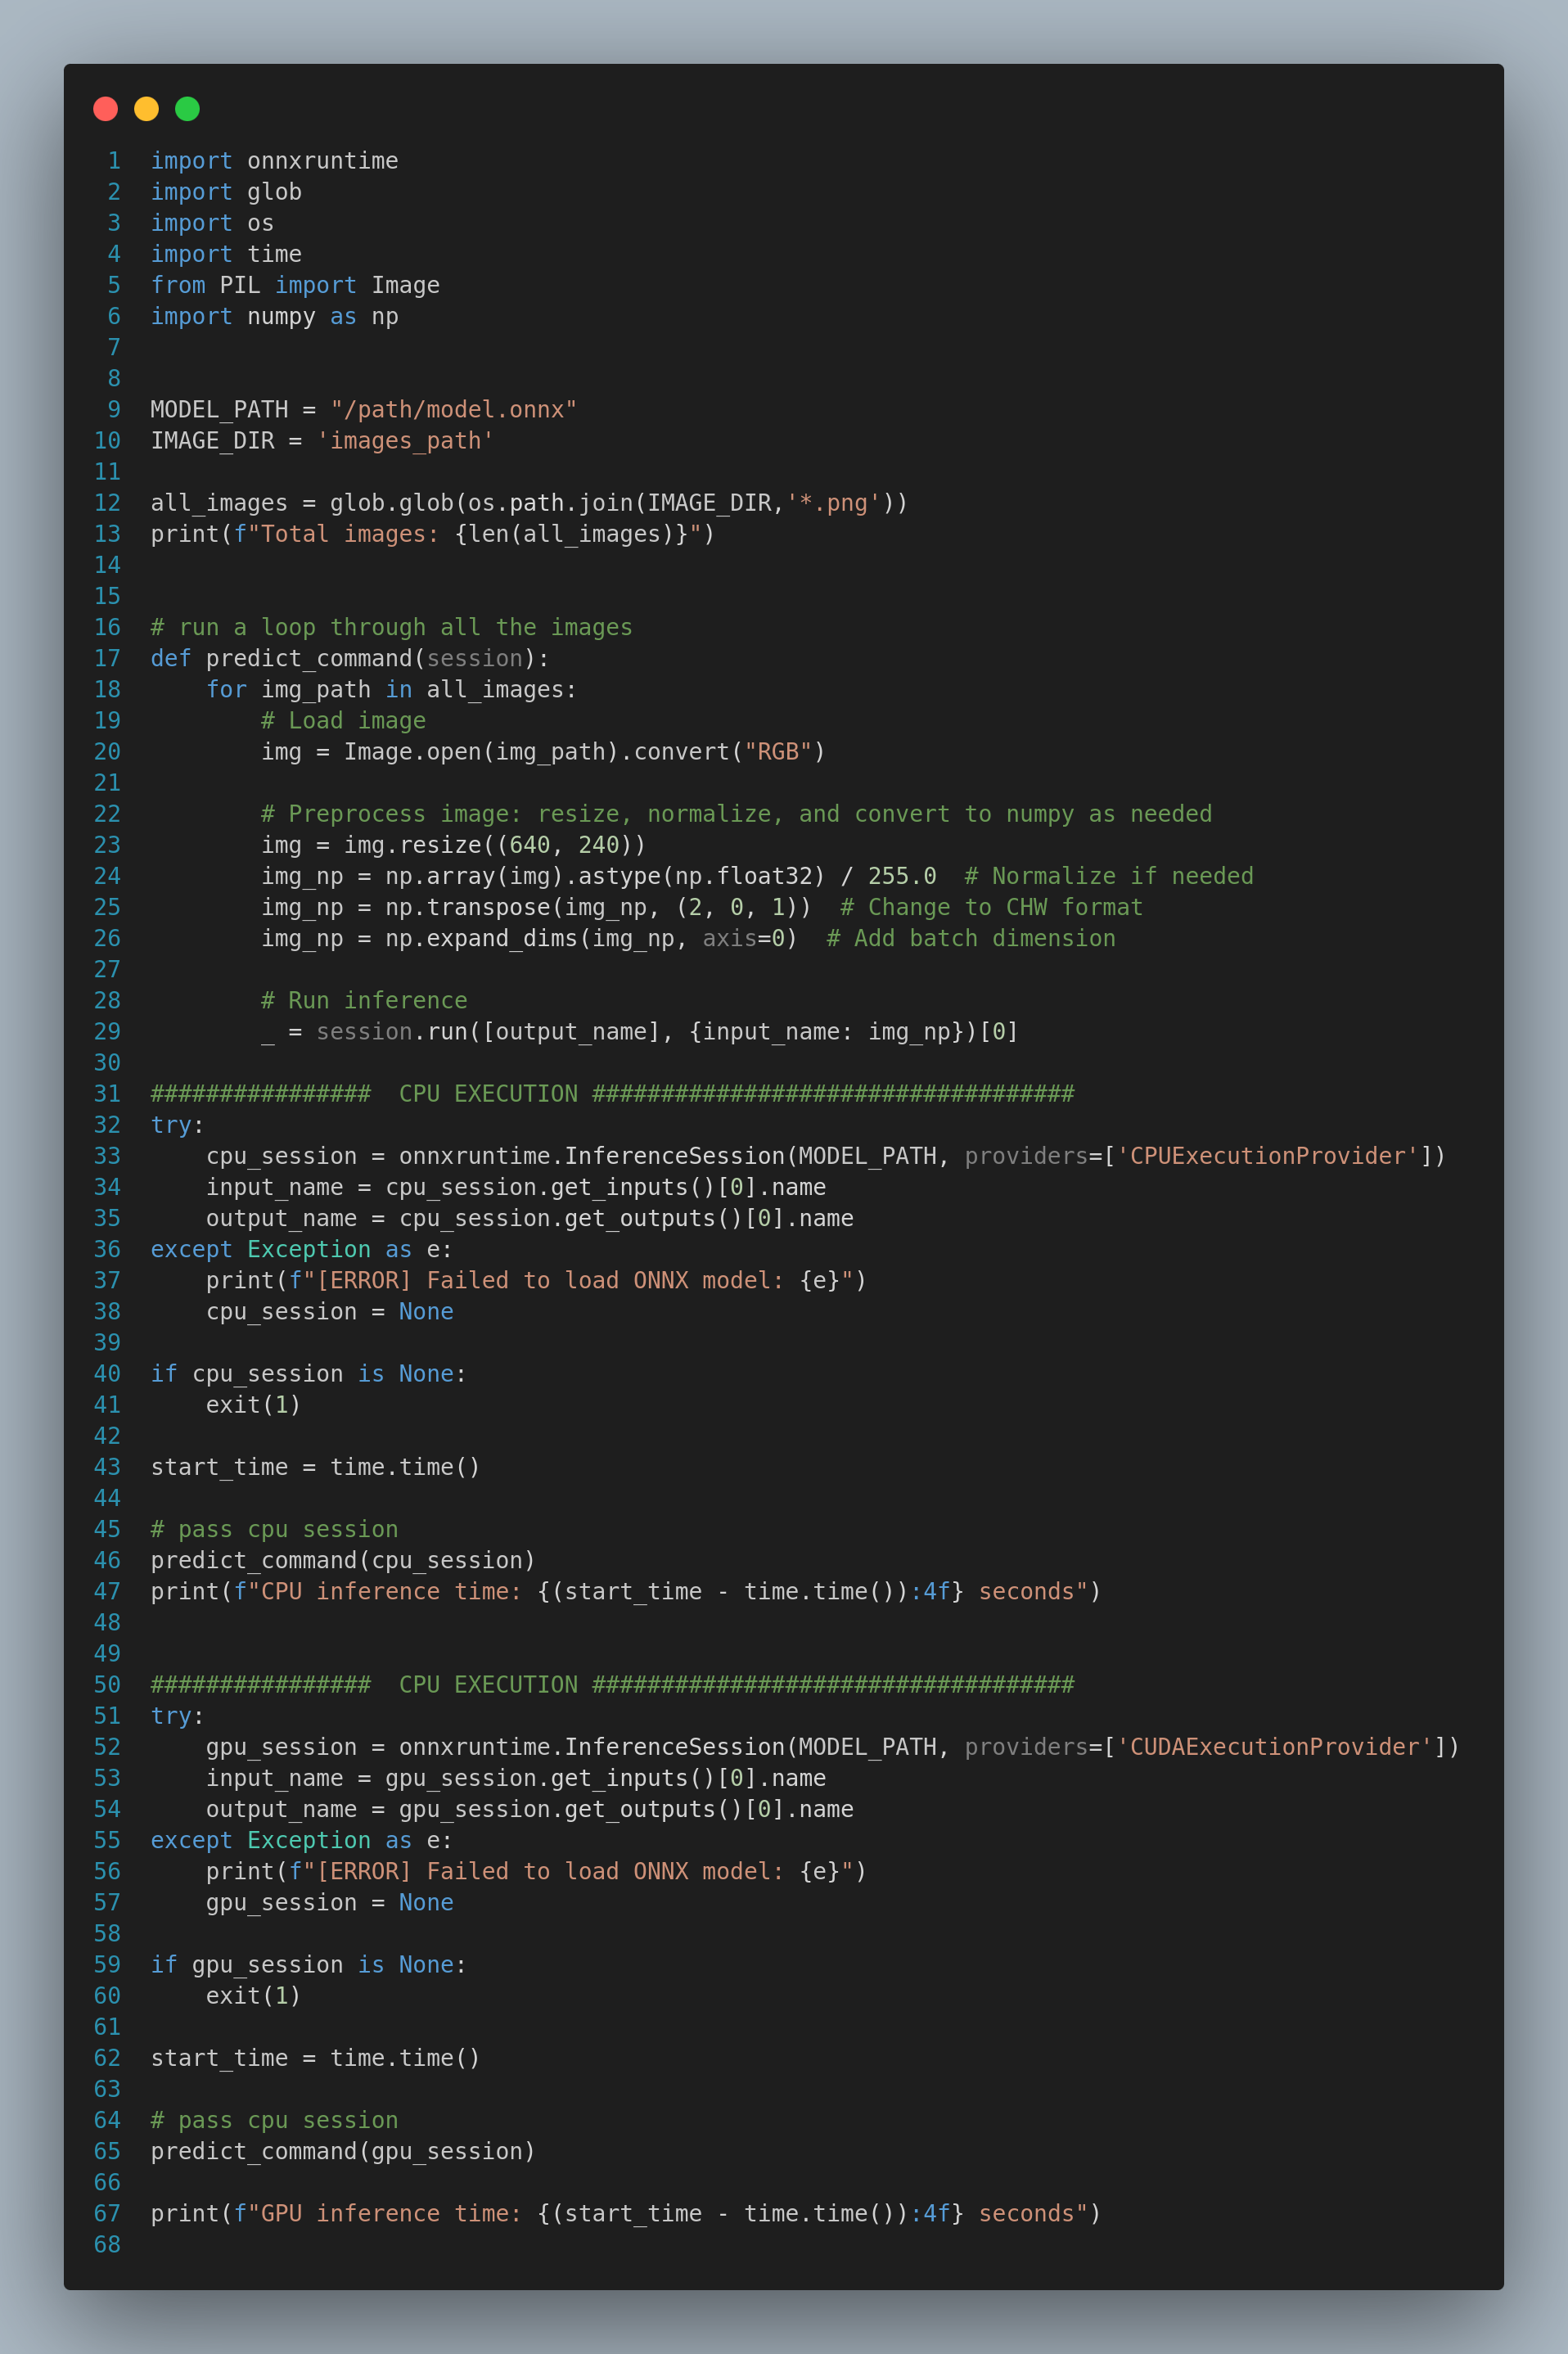
The GPU mode is significantly
faster, processing all the
17,862 images in
46.90 seconds compared to
112.96 seconds on CPU.
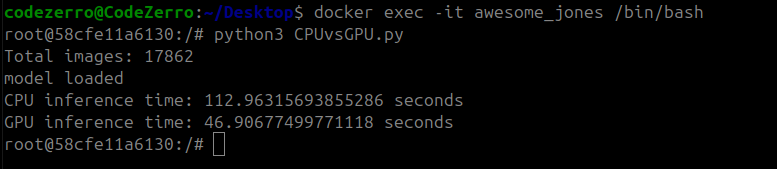
This confirms that the ONNX Runtime is correctly utilizing the GPU for inference, providing a substantial performance boost over CPU execution.
This solution is now the standard setup for future RoboticsAcademy DL exercises that use ONNX models.
Summary:
I chose
Solution 02: onnxruntime-gpu + PyTorch with
                                CUDA Support
as our final path forward due to its balance of
performance, flexibility, and maintainability. This
will become the standard setup for future
RoboticsAcademy DL exercises that use ONNX models.
🏷️ Evaluation of Deep Learning Model Performance in Follow-Line Exercise
In Week 07 , the focus was on preparing and training deep learning models using circuit-based datasets for the follow-line exercise. I created four distinct datasets by splitting data from four different circuits, using three circuits for training and one for testing in each combination. To understand the steering behavior within each dataset, I visualized the angular velocity (v) distributions, which highlighted the diversity and imbalance in steering commands. To address this, I applied upsampling and downsampling techniques to balance the datasets, ensuring that each steering class contained 5,000 samples. Finally, I trained four models on each balanced dataset using the NVIDIA PilotNet architecture, a well-known framework for end-to-end autonomous driving tasks. I also provided training and testing loss visualizations, along with evaluation metrics, for all four models to assess their performance and generalization.
This week, I evaluated four deep learning models using the Follow-Line exercise in RoboticsAcademy, which features four unique circuits. Each model was tested on a circuit it had not previously seen during training, ensuring that the evaluation was performed on truly unseen data. For each test, one circuit was reserved exclusively as the test dataset while the model was trained on data from the other three circuits. This approach allowed for a rigorous assessment of the models' generalization capabilities across different environments.
Test 01:
Test Circuit: Simple Circuit
Train Dataset: Montreal, Montmelo, Nürburgring Circuit
Test: Simple Circuit
Result:
The Simple Circuit completed approximately 79% of the track before it deviated from the path. The circuit maintained proper line detection for 69 seconds.
Test 02:
Test Circuit: Montreal Circuit
Train Dataset: Simple, Montmelo, Nürburgring Circuit
Test: Montreal Circuit
Result:
The Montreal Circuit completed approximately 6% of the track before it deviated from the path. The circuit maintained proper line detection for 10 seconds.
Test 03:
Test Circuit: Montmelo Circuit
Train Dataset: Simple, Montreal , Nürburgring Circuit
Test: Montmelo Circuit
Result:
The Montmelo Circuit completed approximately 86% of the track before it deviated from the path. The circuit maintained proper line detection for 128 seconds.
Test 04:
Test Circuit: Nürburgring Circuit
Train Dataset: Simple, Montreal , Montmelo Circuit
Test: Nürburgring Circuit
Result:
The Nürburgring circuit successfully completed the entire track without any deviations. It maintained consistent line detection and stable movement throughout the circuit. The robot completed the track in approximately 111 seconds, handling both straight sections and curves with accuracy.
I ran each circuit multiple times, but the result was almost the same.
References
[1] RoboticsAcademy Docker Image (RADI)
[4] Digit Classification Exercise
[5] Open Neural Network Exchange (ONNX)
[6] CUDA Toolkit
[7] cuDNN
[8] PyTorch
[10] NVIDIA PilotNet
Enjoy Reading This Article?
Here are some more articles you might like to read next: