Community Bonding Period
Google Summer of Code starts with the Community Bonding period where we get to know about the community and get familiar with the code base and work style.
My mentors and I had our first virtual meetup/discussion on 22nd May which started on a very good note. After introducing ourselves to each other, we got straight off to work. I was briefed on what tech stack and ideas our project would revolve around and also what is expected from me as a participant. Following this, we discussed which all new exercises could be added to the academy this summer. Before starting to build or even finalize any exercise, it was essential to agree upon a common model inference architecture that would be followed for all the Computer Vision exercises down the line. My mentor David had suggested we follow an ONNX format for the models, which indeed was a very good idea as that way we could perform model inference and optimization within the core application via the ONNX framework. We also came to know of AILIA SDK, a standard development kit that runs on top of the ONNX runtime and provides an interface for it, to ease up its use. Since I had previously never used the ONNX framework, the first thing I would have to do is to try and implement its use for some demo models. I was also asked to research more on human detection state-of-the-art models and databases, which could serve as a component in our starting exercises.
To Do
- Get hands-on using the ONNX framework with different models(Test and implement).
- Learn more about AILIA SDK and decide whether it suits our needs or not.
- Document pros/cons.
- Research on human detection state-of-the-art models and databases.
ONNX Framework
ONNX (Open Neural Network Exchange Format) is a format designed to represent any type of Machine Learning and Deep Learning model. Some examples of supported frameworks are PyTorch, TensorFlow, Keras, SAS, Matlab, and many more. In this way, ONNX can make it easier to convert models from one framework to another. The main goal of ONNX is to bring together all the different AI frameworks and make it as easy as possible to make them communicate with each other in order to build better models which can be supported on any type of platform or hardware. For more information visit.
Pros
- You can create a model in one programming language, then execute in an entirely different run time environment (e.g. Imagine creating your model in Python, then deploying onto a C# software solution).
- You can create a model using almost any AI tool, the ONNX run time will treat it generically. This yields a generic, consistent interface for any model you create.
- Optimization tools for the converted models are available, which can result in faster inference.
- With ONNX, you don’t need to package the various dependencies used to create your model, all you need is the ONNX runtime.
Cons
- ONNX is relatively new, so the documentation is limited.
- It directly supports the conversion of only a limited volume of libraries into the ONNX format(Although the famous ones like TensorFlow, PyTorch, Keras are supported).
- There exists an absence of examples. This could make adoption a challenge.
Ailia SDK
While learning about the ONNX framework, I came across the AILIA SDK, an inference specific SDK, which runs over the ONNX runtime and provides an interface for model inference. It can load models trained by learning frameworks such as Pytorch, Keras, TensorFlow, Chainer, etc., and perform inference at the edge at high speed and offline. If you read properly about the ONNX runtime, you would realize that it does the same thing, then why use this? Well, it turns out that it makes the process of inference easier by providing simple functions for model inference and cutting short of all input specifications apart from the data itself. Previously, I thought that it would also provide tools to automate the conversion of models from different frameworks to ONNX format, but turns out I was wrong. It takes the ONNX formatted models itself as input. The SDK also provides features for GPU inference, but again turns out that is also available with the standard onnxruntime-gpu library. To be honest, by now I was running out of reasons to use the AILIA SDK.
Pros
- Relatively easy inference at the edge at high speed and offline.
- Provides optimization tools for faster model inference.
- Runs on top of the standard ONNX runtime, so ONNX format is supported.
- Easy conversion of the converted model input layer from channel first to channel last and vice versa.
Cons
- Since it runs on top of the ONNX runtime itself, all the major cons of the former would reflect onto this also.
- The SDK is very new and apparently not so famous, this leads to very limited documentation and community support. Any problems in the future would be time-consuming to tackle.
- Apart from an easier inference interface, it doesn’t provide any solid reason to be an alternative to the standard onnxruntime library.
Hands on with the ONNX format
1. Exporting models to the ONNX format
To try and test the usability and scalability and also to get my hands on with the ONNX format and the corresponding conversion, I tried creating and training my own Neural Network(very naive) model (available here on my GitHub) on the MNIST data set for digit prediction. I used PyTorch for this demo model, however you can use any for the supported frameworks. I advice you to train your model, save the sate dictionary and then proceed to it’s conversion to the ONNX format, in case if the conversion fails due to some blunder, you wouldn’t have to retrain again :) The basic steps include:
- Creating your model and training it with the available MNIST dataset in PyTorch.
- Saving the state dictionary of the trained model.
torch.save(model.state_dict(),"PyTorch_Model.pt") # saves only the sate dictionary(weights).This is the preferred way due to less ambiguity in future loading.or
torch.save(torch.save(net, "PyTorch_Model.pt")) # saves both the model weights and architecture.
# Easier but less prefered way, may cause problems while loading.
For more on how to save PyTorch models, refer to this.
- Converting your trained model to ONNX format. (PyTorch has a dedicated library for this, for other frameworks you might have import some dependencies. Refer to this for models trained in other frameworks.)
dummy_input = Variable(torch.randn(1, 1, 28, 28)) # tensor of random numbers, which represents the input shape to the model.
torch.onnx.export(model, dummy_input, "ONNX_Model.onnx", opset_version=10)
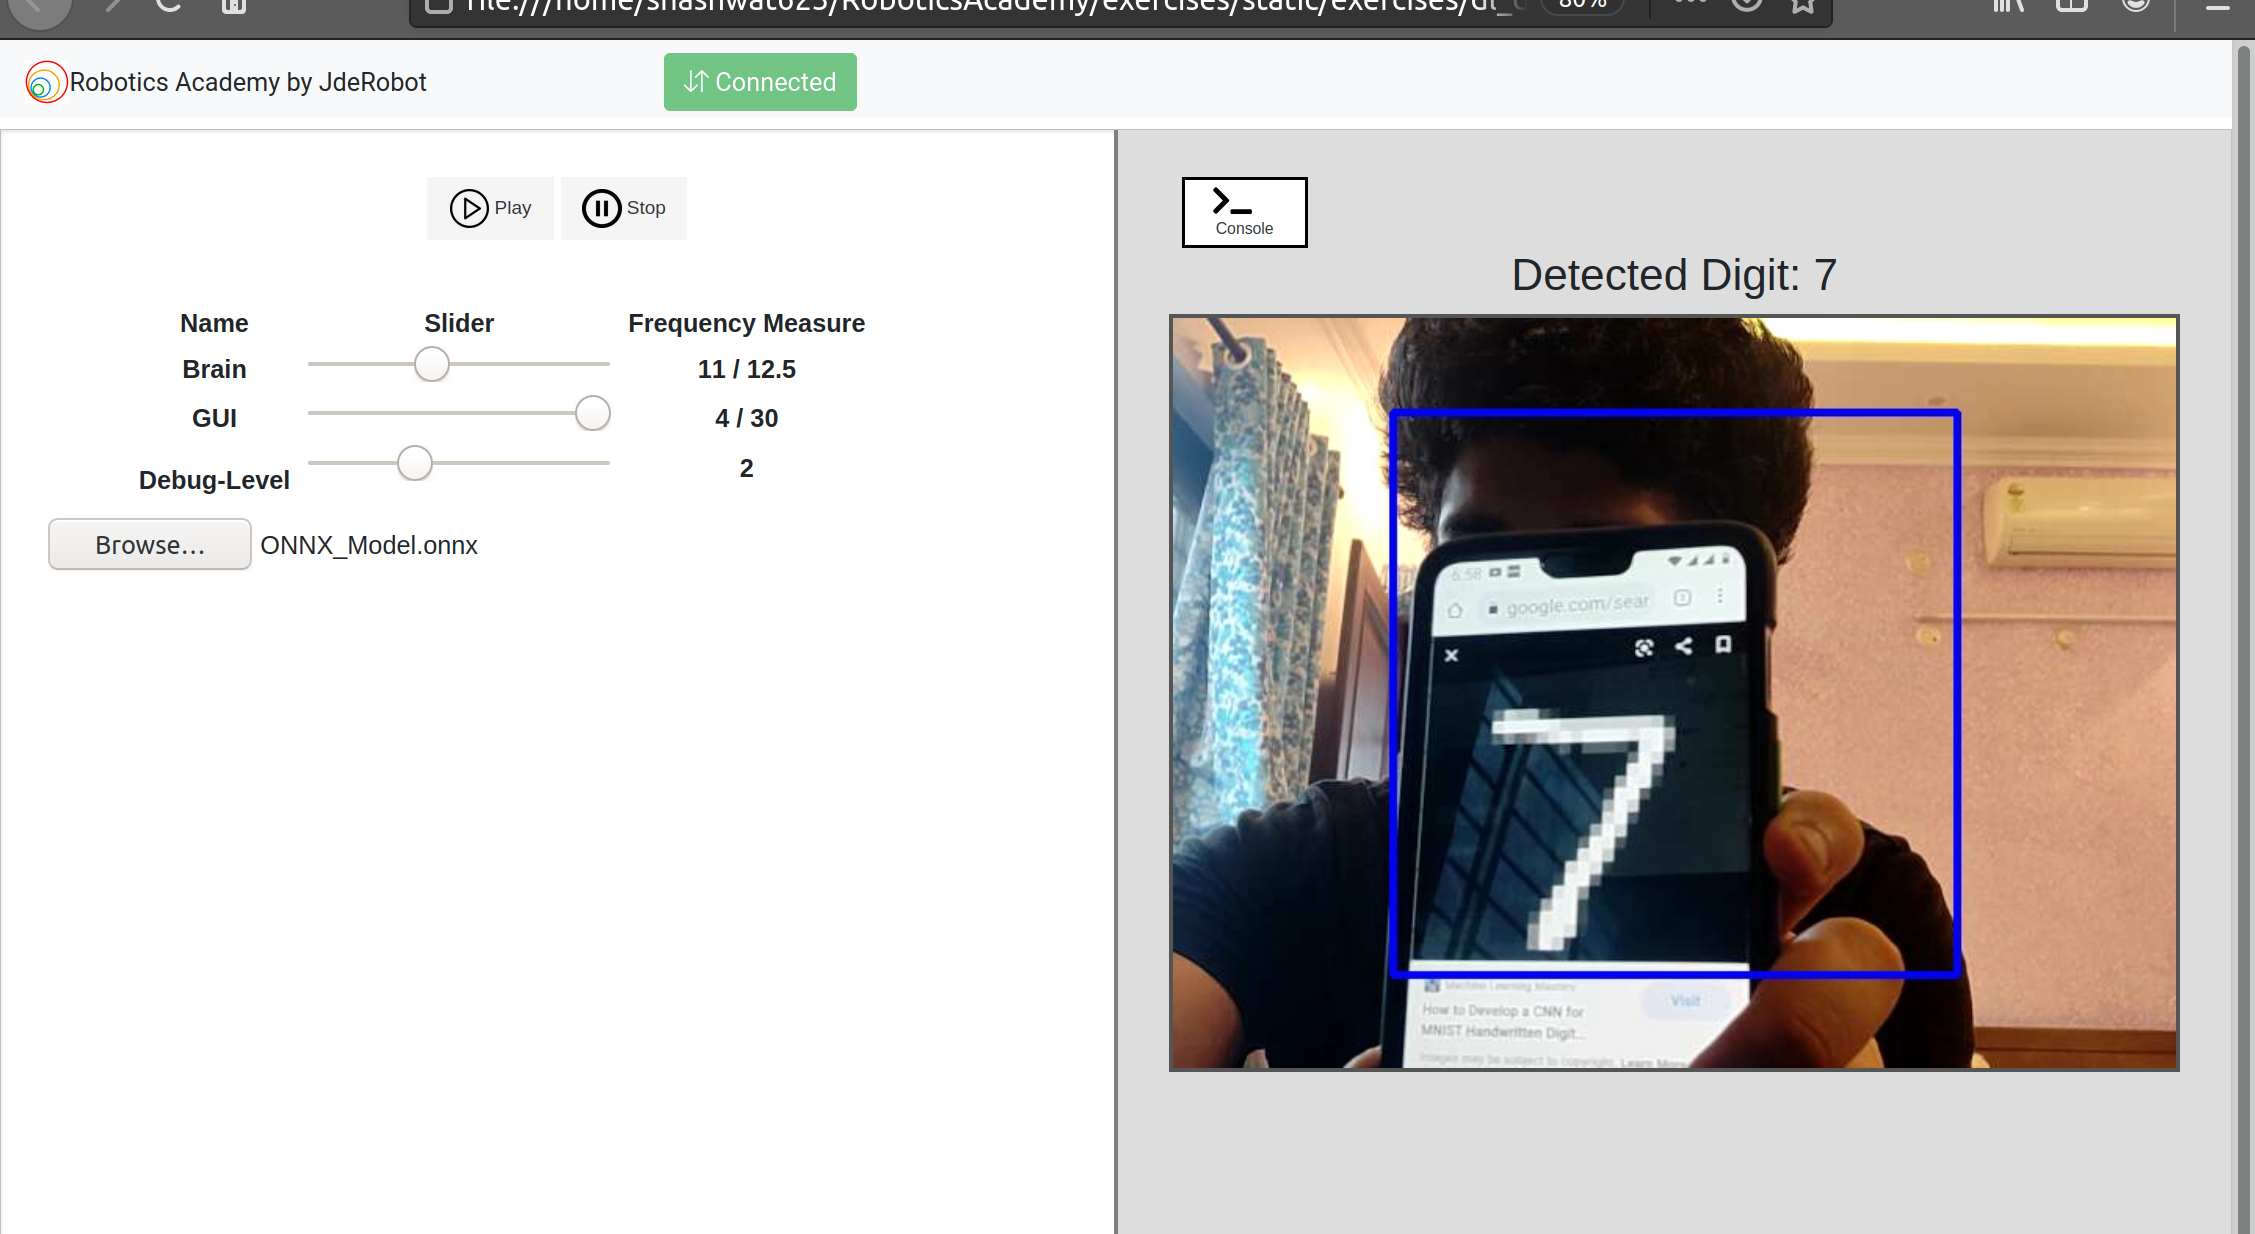
2. Performing Inference on the ONNX model
For this I chose the dl_digit_classifier exercise (available here), which was created and uploaded by my mentor David, in the Robotics Academy. However, you can also write your own code for performing inference. In general we would be using ONNX Runtime for inferring on the ONNX models. ONNX Runtime is a deep learning framework developed by Microsoft that performs inference using the ONNX format.
import onnxruntime as rt
sess = rt.InferenceSession("ONNX_Model.onnx")
res = sess.run([output_name], {input_name: x})
# output name is the name of the output layer.
# x is the appropriate shaped input given to the model
Everything was going good till now, but it seems Murphy’s law does hold true - “Anything that can go wrong will go wrong”. Since I was using a surface laptop, and Linux distributions are known for their notorious insupportability on surface devices. Due to the very specific hardware which Microsoft uses for them, many external peripherals like keyboard, camera, bluetooth, etc., were not supported by default and neither were there any wide availability of drivers. Till now, I was using a custom surface-linux kernel, which was thankfully available by an open source community on GitHub. This custom surface kernel for Linux did solve all of the above issues except for the camera. Since my state was under COVID lockdown, I could not order non-essential things like an external camera. By now I was eager to perform Inference on the model I had trained, so I tried using my phone as the web cam input to the laptop and Hurray!!, it worked using the droidcam application, which supports the required Video4Linux format. So now I was good to go…
For more information/examples on using the ONNX runtime refer to this article.
3. Using the ONNX Official Optimizer
Next, I tried playing around with the ONNX optimizer, which optimizes ONNX format models for inference processing. Using the mobilenet v2 model downloaded from the original ONNX Model Zoo, I ran the inference 20 times on the same input image data in ONNX Runtime, and displayed the time consumed for the three classes that were most likely to result from the identification of the input image, resulting in the following output.
elapsed: 0.46878528594970703
+ idx=0
  class=analog clock
  prob=23.10076332092285
+ idx=1
  class=wall clock
  prob=20.599037170410156
+ idx=2
  class=barometer
  prob=17.743553161621094
On the other hand, performing inference on the model after running the optimization, I got the following results.
elapsed: 0.37501955032348633
+ idx=0
  class=analog clock
  prob=23.10076904296875
+ idx=1
  class=wall clock
  prob=20.599044799804688
+ idx=2
  class=barometer
  prob=17.743555068969727
Just by running the model through the optimization library provided by ONNX, the processing time was reduced from about 0.469 seconds to about 0.375 seconds. That’s almost 20%. The script I used for optimization simply loads the onnx file and runs the onnxoptimizer on it.
import onnx
import onnx.optimizer

src_onnx = 'mobilenetv2_1.0.onnx'

# load model
model = onnx.load(src_onnx)

# optimize
model = onnx.optimizer.optimize(model, ['fuse_bn_into_conv'] )
This script applies the fuse_bn_into_conv process provided by the official optimizer. Applying fuse_bn_into_conv removes the BatchNormalization operations by altering he weights and biases of Convolution layers. However, other process attributes can also be given to the optimizer function depending on the architecture of your model.
Study on Human Detection
Next, I started to study more on Human Detection as this skill could possibly serve as our starting point in implementing exercises.
Human Detection is a branch of Object Detection. Object Detection is the task of identifying the presence of predefined types of objects in an image. This task involves both identification of the presence of the objects and identification of the rectangular boundary surrounding each object (i.e. Object Localisation). An object detection system which can detect the class “Human” can work as a Human Detection System.
I started off with reading about the earlier Human and face detection approaches which were mostly related to Machine Learning algorithms. Since my project deals specifically in the Deep Learning approach. I will not go much into it.
Early approaches for Human Detection
Although these approaches were relatively faster and less resource exhaustive, they had a few drawbacks:
- Missed Detections
- False Detections and Duplicate Detections
- Unreliable Detection Boundary
- Flickers in Detection
Most of the issues present in early human detection approaches are fixed in newer deep learning based approaches.
Modern approaches for Human Detection
Modern approaches for human detection are characterized by following special features:
-
They are “Deep Convolution Neural Networks” - Modern approaches for human detection are largely based on Deep Convolution Neural Networks. This trend started with AlexNet which won the Imagenet Large Scale Visual Recognition Challenge (ILSVRC) in year 2012 using a Deep Convolution Network (CNN) for Image Classification. Since then, CNNs were widely adapted for various computer vision problems such as Image Classification (identifying what type of an object an image contains), Object Detection (detecting different types of objects in a image)and Object Localization (determining locations of detected objects). “Human Detection” as we identified previously, is a special case of Object Detection and Object Localization.
-
They are “Multi-class Object Detectors” - Another key feature of modern CNN based Object Detection systems is that they are capable of detecting multiple classes of objects. Thus, modern state-of-the-art Human Detectors are not just Human Detectors, but accurate Object Detectors which can detect multiple types of objects including humans.
-
They are more accurate than earlier approaches and provide a tight consistent boundary around a detected person. Additionally, these models are very less likely to give false detections, duplicate detections and missed detections.
I wanted to explore a few pre built human detection models. Turns out there aren’t many good and clear Deep Learning models on the internet which are based purely on Human Detection, rather you will find many which are based on object detection in general, in which humans are one of the many detectable classes.
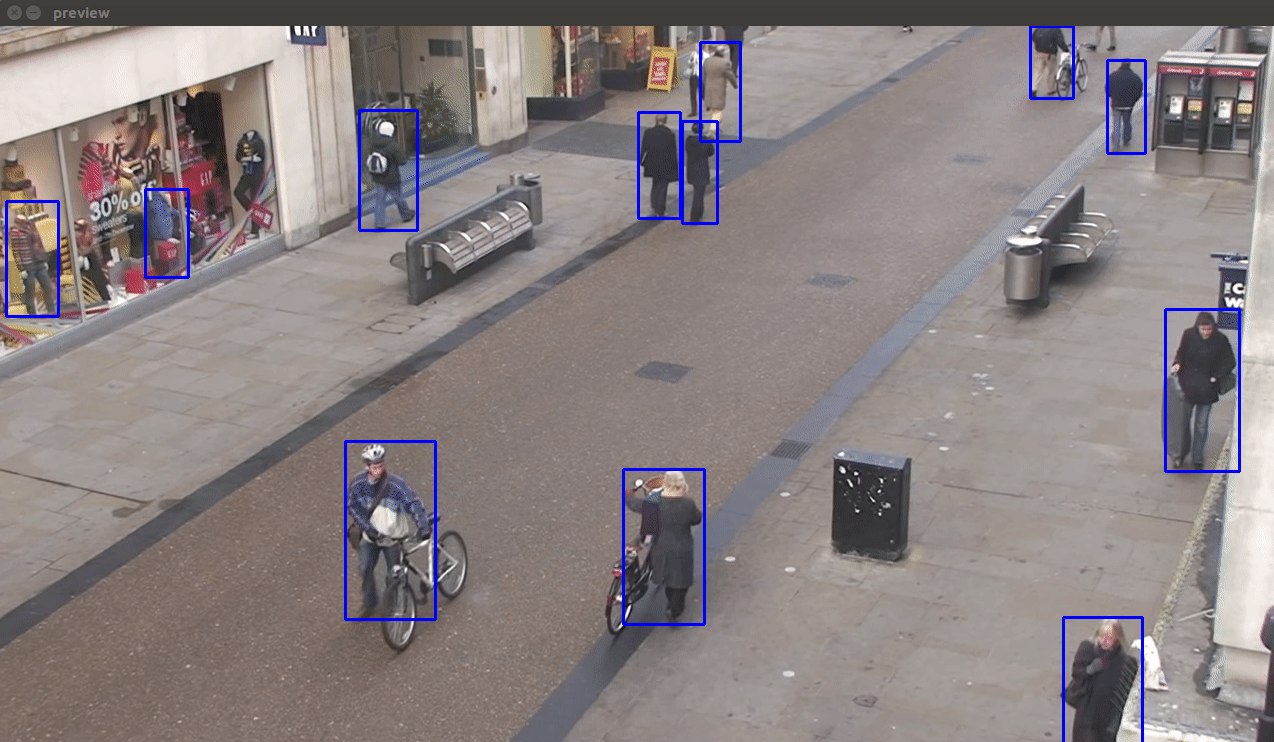
So I started exploring a few well known object detection models available in the TensorFlow model zoo. Out of them all, I got interested in these three models:
- ssd_mobilenet_v1_coco - This is the least accurate from all three, but the fastest. It is capable of working in real-time on modern Android phones. This model performs reasonably well in detecting close-by-objects occupying a large view space. But it performs poorly in the test video since it contains a large number of people occupying a small space of the view.
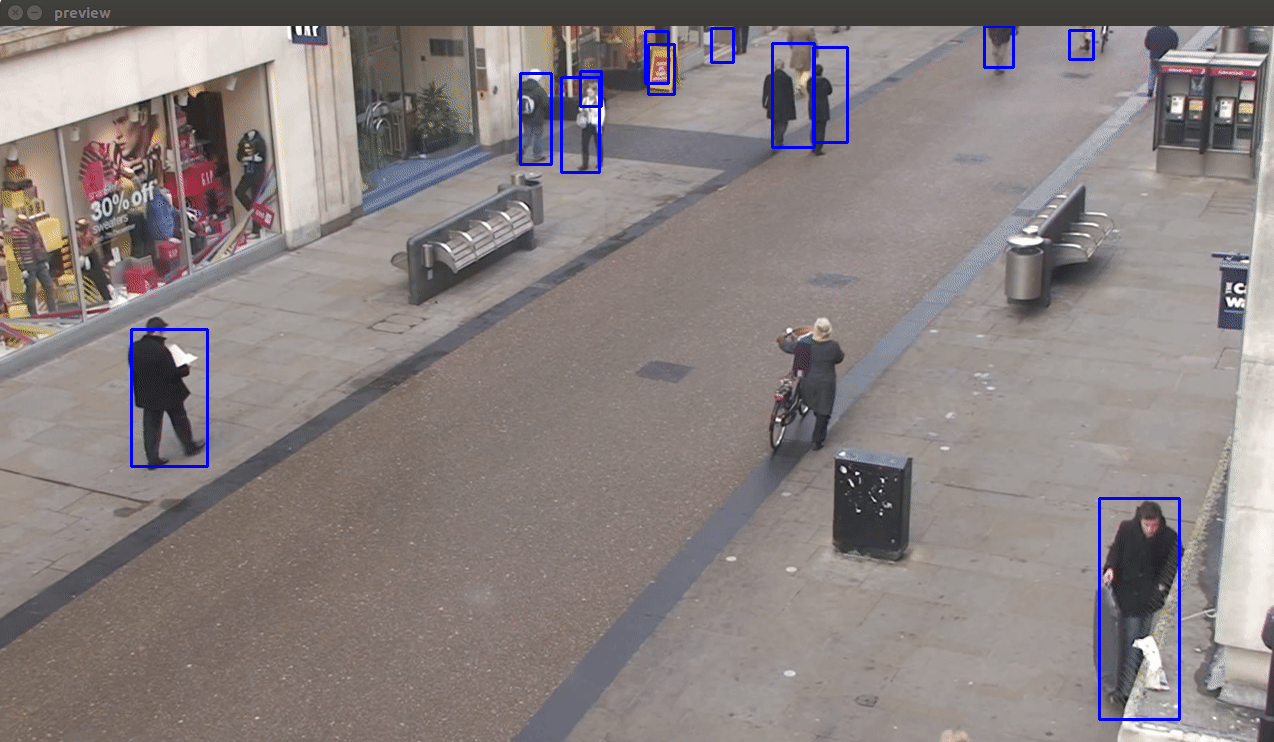
- Faster RCN Inception V2 COCO Model - It gives a fair trade-off between accuracy and speed for GPU accelerated environments.
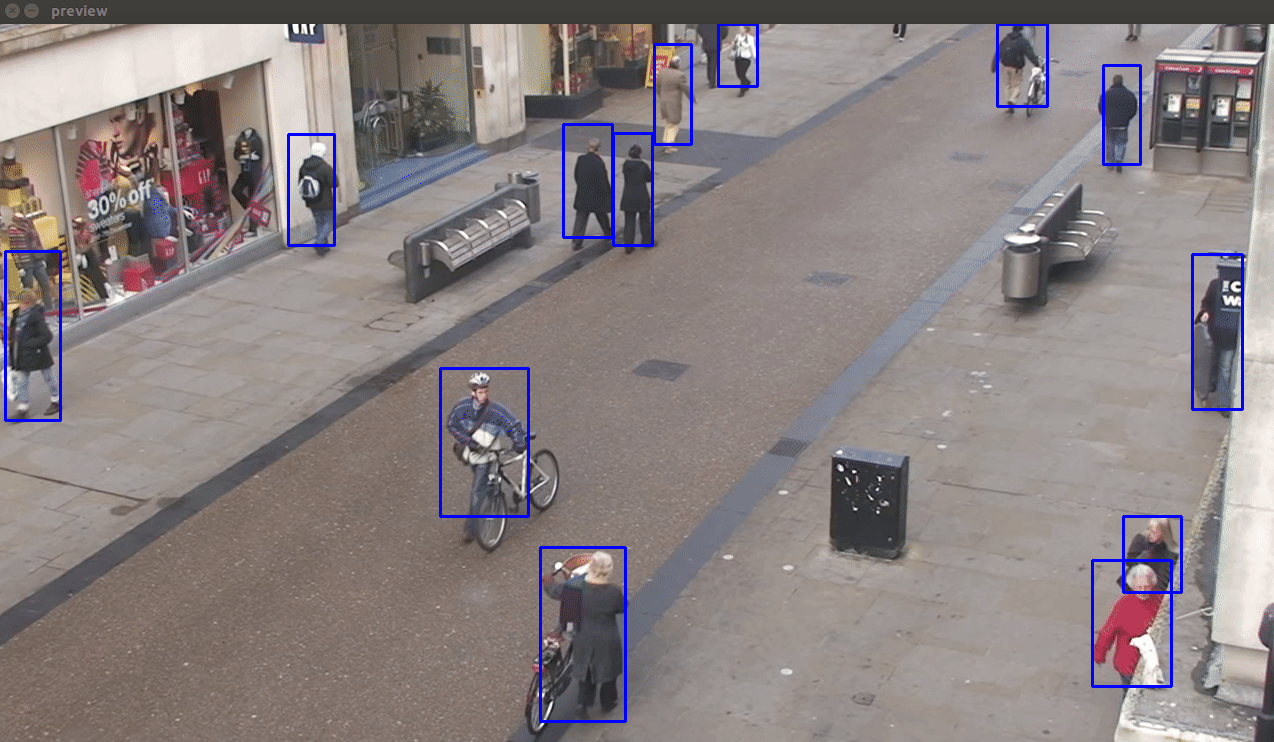
- Faster RCN NAS COCO Model - This model is the most accurate amongst these(even detects the dummy Mannequins on the left :P). Hardly any false detections, duplicate detections, flickering effects or missed detections are noticed. However, it is also the slowest.
Brushing up more with the required tech stack
I utilized the remaining days of the community bonding period brushing up and getting more familiar with the following:
-
Version Control Operations and Git commands - Although I was already quite familiar with git and the related version control paradigm, I still felt I was lacking some commands-related knowledge to work from the shell. All my previous projects on GitHub were mainly contributed by me, so I was still a little rusty with the concepts of branches, when do merge conflicts arise, remote locations naming conventions, good GitHub practices, etc. There were times when I accidentally pulled changes from the remote master branch to some other branch in the cloned repository, resulting in merge conflicts, there were times when I accidentally pushed changes upstream to the main remote repository rather than the forked remote origin, there were times when I accidentally forgot staging changes before committing them, always wondering what caused the error. All this mainly happened because previously I was more used to the pampering GitHub graphical interface to do stuff. I worked on my git skills, learned from my previous mistakes, and realized how flexible and easy git can become if one is familiar with its shell scripting and commands. To be honest, I no longer feel like or even the need of using the graphical interface on GitHub anymore for stuff that can be done from the shell.
-
Image Processing - I knew apart from good Deep Learning skills, image processing skills are equally important for projects related to Computer Vision. I started to refer to my previous projects and different articles and videos for the same, picking up relevant information from where ever I could.
-
Fine Tuning and modifying network architecture - Since our project was focused on uploading the trained Deep Learning models for the particular tasks, I realized asking naive users to build a model from scratch for certain exercises like human detection would sound like an overkill, instead what many people would prefer doing would be to modify some pre-existing trained/untrained network architecture, and fine-tune them according to their liking and requirements of the exercise. For this reason, I started to learn more about this and its feasibility.
-
Understanding the pre-existing code base for the web-template-based exercises - Next, I spent a day analyzing the pre-existing code base and the general workflow of the exercises based on the web template. Since the newer exercises would also be based on the web template, it was essential to get familiar with its codebase, which would help me build upon the pre-existing workflow. During this time, I also got more familiar with docker containers and how the exercises launched from the front end were being mapped back to the container.
A few extra things done:-
-
ONNXRUNTIME-GPU issue - Since my laptop did not have any CUDA-supported dedicated GPU, I started playing around with the onnxruntime-gpu library on Google Colab, which provides free GPU runtime. Until now I had only tested and performed inference on the onnxruntime, which is only for CPU. I was planning to implement both the CPU and GPU libraries in the exercise to support both types of users. As it turns out both the onnxruntime and onnxruntime-gpu had the same import name, and by default, the GPU version gets imported if both are installed. The GPU version requires some specific CUDA dll’s to be pre-installed, this means non-cuda users would always get an error. I raised an issue for the same on the onnxruntime GitHub page, turns out it was a known issue to the developers and was being taken care of. To know more about it, please refer to my issue here. My mentors and I decided to hold on with the GPU inference support till the issue was solved. I will follow up with this later in the blog :)
-
Solved the static number of consecutive frames issue - The dl_digit classification exercise followed a policy of a specific number of consecutive detections to be the same to output any detection. This was mainly done to make the detections more accurate and prevent any false positives. The number of consecutive frames to be the same was hardcoded to 20 frames. A constant value for this would result in the Inference time being very specific to what frame rates a user is getting. I helped to make this more dynamic by making the required changes and keeping the value of
n_consecutive_framesto be dependent on the present value of FPS i.en_consecutive_frames = FPS/2. To know more on this, refer to this PR. -
Started building a basic prototype for the Human Detection exercise - I planned to utilise the last remaining days of the community bonding period to start off with our first exercise implementation. More information on this is provided under Week 1.