Week 5
Issues and PR’s raised
- Error while running the noetic image container
- Updated docker image build instructions for noetic branch
Added video inference feature
As of now the exercise only contained the live inference feature, I was asked by my mentor to update the exercise with a video inference feature, which simply means performing inference on an uploaded video. Since I was very unfamiliar with front end development, I referred to online resources for this and found several solutions on how to do it with jQuery, but I needed a pure JS implementation so I simply used the FileReader API. This required making the corresponding front and back end changes.
- Updated
exercise.html
<div class = "div-flex" id = "video-upload">
    <div id="video_selector" class="inline-div">
        <input class = "button-style" type="file" id="video_file" name="video_file" accept="video/*">
    </div>
    <div class="inline-div">
        <button id="Upload" type="button" onclick="Upload_Video()"> Upload Video</button>
    </div>
</div>
- Updated
ws_code.js
function Upload_Video(){

	var input = document.getElementById("video_file");
	var fReader = new FileReader();
	fReader.readAsDataURL(input.files[0]);
	fReader.onloadend = function(event){
		alert("Uploading video file...");
		websocket_code.send("#save_video" + event.target.result);
		alert("...the video has been sent!");
	}

}
- Updated
exercise.py
def handle(self, client, server, message):
    if(message[:11] == "#save_video"):
    try:
        self.saveVideo(message[11:])
    except:
        pass

def saveVideo(self, raw_video):
    print("Received raw video")
    try:
        raw_video = raw_video.split(",")[-1]
        raw_video_bytes = raw_video.encode('ascii')
        raw_video_bytes = base64.b64decode(raw_video_bytes)
        with open("uploaded_video.mp4", "wb") as f:
            f.write(raw_video_bytes)
            print("Video Saved")
    except:
        self.console.print("Error in decoding")
- Updated
hal.py
def __init__(self):
    self.uploaded_vid_capture = cv2.VideoCapture("uploaded_video.mp4")
    self.frame_number = 0

def getVid(self):
    self.uploaded_vid_capture.set(cv2.CAP_PROP_POS_FRAMES, self.frame_number)
    success, img = self.uploaded_vid_capture.read()
    return success, img
Made template changes to make exercise look minimalistic
By now our exercise had a couple of features ranging from live inference, video inference, model benchmarking, model visualization, the sliders, and the corresponding select/upload buttons. This made the template look kinda messy and confusing to interpret, I was asked to make it more dynamic and display the specific functionality buttons only when the corresponding mode is selected, possibly from a new drop down menu of features. I was given a rough sketch of how it would look by my mentor.
Since I was was totally new to front end programming, it took some time to refer to online resources and decide accordingly as to how the changes would be implemented.
- Added dropdown menu for mode selection
- Made corresponding changes to the CSS and JavaScript files
-
Implemented
main.jsspecifically for event handling// main.js $('#code-menu').on('change', function() { if (this.value === "video") { $("#video-upload").css("display", "flex"); $("#Video_Infer").css("display", "inline-block"); $("#Live_Infer").css("display", "none"); $("#benchmark").css("display", "none"); $("#visualizer").css("display", "none") $("#stop").css("display", "inline-block"); } else if (this.value === "live"){ $("#Video_Infer").css("display", "none"); $("#Live_Infer").css("display", "inline-block"); $("#video-upload").css("display", "none"); $("#benchmark").css("display", "none"); $("#visualizer").css("display", "none") $("#stop").css("display", "inline-block"); } else if (this.value === "bench"){ $("#Video_Infer").css("display", "none"); $("#video-upload").css("display", "none"); $("#Live_Infer").css("display", "none"); $("#benchmark").css("display", "inline-block"); $("#visualizer").css("display", "none") $("#stop").css("display", "inline-block"); } else if (this.value === "visual"){ $("#Video_Infer").css("display", "none"); $("#video-upload").css("display", "none"); $("#Live_Infer").css("display", "none"); $("#benchmark").css("display", "none"); $("#visualizer").css("display", "inline-block") $("#stop").css("display", "inline-block"); } else { $("#video-upload").css("display", "none"); $("#Video_Infer").css("display", "none"); $("#Live_Infer").css("display", "none"); $("#benchmark").css("display", "none"); $("#visualizer").css("display", "none") $("#stop").css("display", "inline-block"); } });
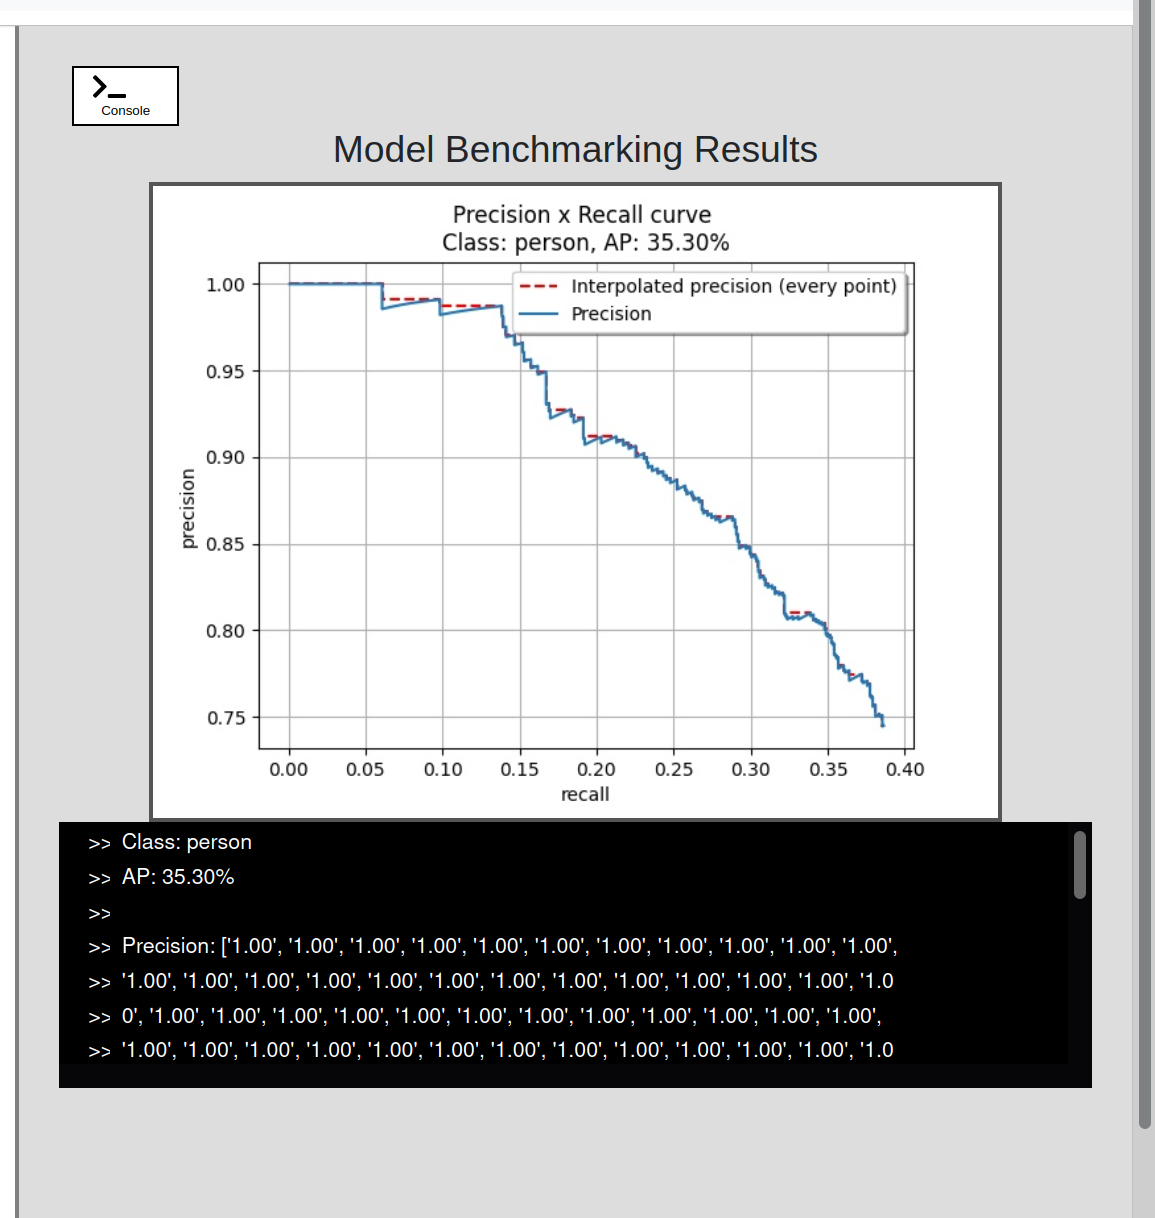
Added benchmarking results and graph on the exercise console and canvas
-
As of now the output graph after complete benchmarking use to just pop up separate from the exercise template. This would cause problem when launching exercise from the docker container as in that case separate pop ups wouldn’t be displayed. This problem would be solved by integrating the benchmarking graph within the web-template canvas, so I did the same.
-
Also, it was important to display the continuous precision and recall values on the in-template console as part of benchmarking. This was problematic as the in-template console was made specifically for commands and not large output chunks. It only appended and displayed text buffers in a single line, which means by default the entire output from the
results.txtfile would be displayed in a single line, which is of course not readable. I made my way around this by reading the output file line by line and only appending the first 100 characters of the line in the text buffer and adding the rest in the next call toconsole.print(), and so on.
f = open(os.path.join(savePath, 'results.txt'), 'r')
lines = f.readlines()
for line in lines:
    if(len(line) > 100):
        start_index = 0
        end_index = start_index + 100
        while(end_index <= len(line)):
            self.console.print(line[start_index:end_index])
            start_index = end_index
            end_index = min(end_index+100, len(line))
            if(start_index == end_index):
                break
    else:
        self.console.print(line)
f.close()
- There was another problem regarding the console, it only displayed a maximum of 100 lines to maintain the content of the console. This was done to prevent the window from hanging. The exercise output for benchmarking on even 100 frames required more than that. I had to make some changes to the
console.jsfile to accommodate the console for this exercise. I guess keeping the limit to 200 lines would be just fine for our case.
function next_command(){
    // Limit the content of the console to 200 lines
    if(command_number == 200){
        var command_to_delete = document.getElementsByClassName("Console-item")[0];
        command_to_delete.remove();
        command_number = command_number - 1;
    }

    // Make way for the next terminal input
    command_number = command_number + 1;
    command = document.getElementsByClassName("command")[command_number];
    }