This is a draft of the document of first exercise.
The goal of this exercise is to learn the underlying infrastructure of Industrial Robot exercises(ROS + MoveIt + our own industrial robotics API) and get familiar with the key components needed for more complex exercises by completing the task of pick and place multiple objects and classify them by color or shape.
Installation
- Install the General Infrastructure of the JdeRobot Robotics Academy.
- Install MoveIt
sudo apt install ros-melodic-moveit sudo apt-get install ros-melodic-ros-control ros-melodic-ros-controllers - Install Industrial Robot package
mkdir -p catkin_ws/src
cd catkin_ws/src
after pull request to the industrial robot repo
git clone https://github.com/JdeRobot/IndustrialRobotics.git -b pick_place_basic
cd ..
Update ROS dependencies
rosdep update
rosdep check --from-paths . --ignore-src --rosdistro melodic
rosdep install --from-paths . --ignore-src --rosdistro melodic -y
Build workspace
catkin buildExport environment variables
echo 'source '$PWD'/devel/setup.bash' >> ~/.bashrc
echo 'export GAZEBO_MODEL_PATH=${GAZEBO_MODEL_PATH}:'$PWD'/src/IndustrialRobotics/industrial_robot/models' >> ~/.bashrc
source ~/.bashrc
How to run the exercise
TO launch the exercise, open a terminal windows, navigate to the ROS workspace which contains Industrial Robot folder and execute following command:
roslaunch industrial_robot pick_place_basic.launch
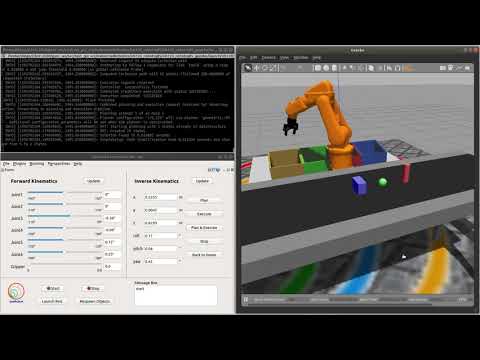
Two different windows will pop up:
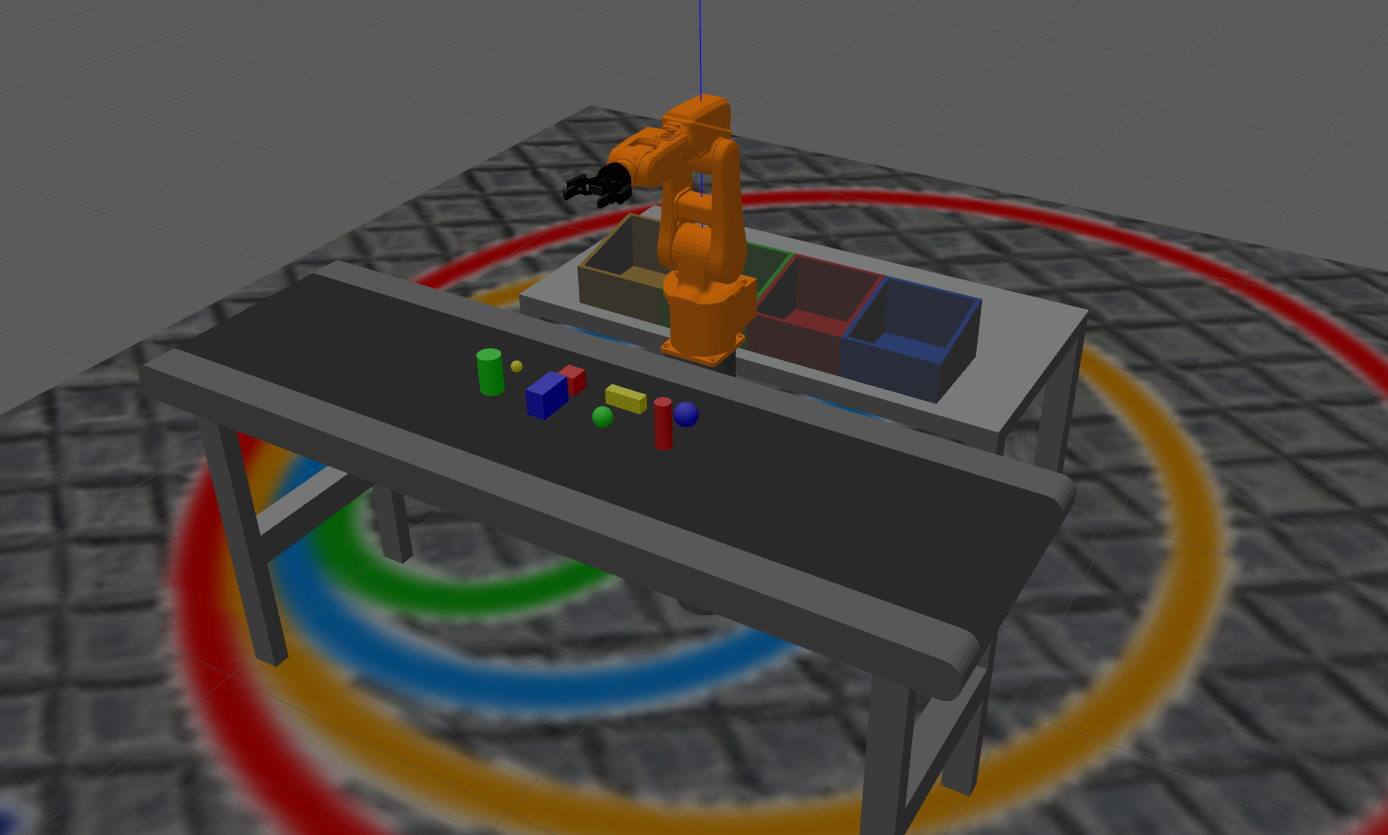
- Gazebo simulator: A warehouse environment with a industrial robot(robot arm and gripper), multiple objects, a conveyor and two boxes will be shown in Gazebo.
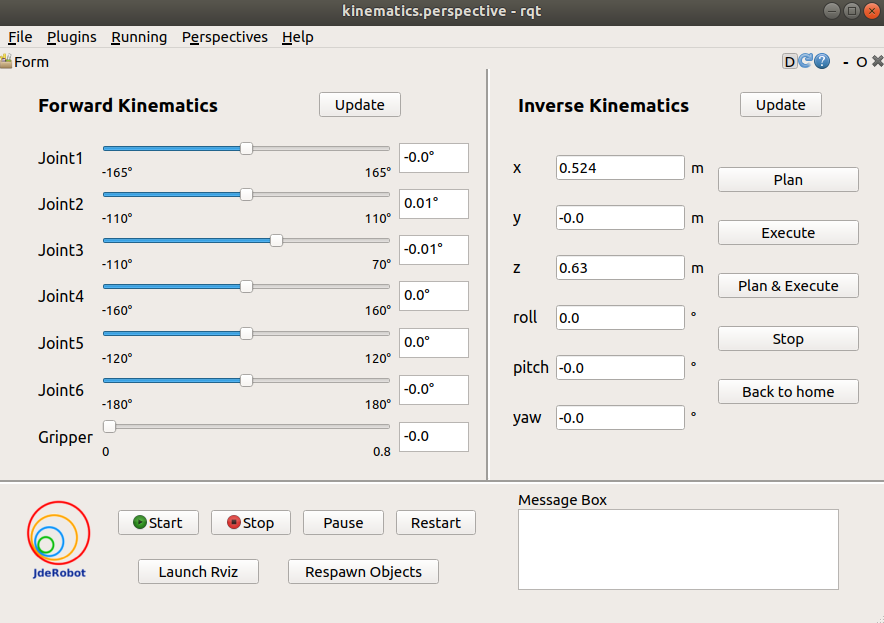
- Industrial robot teleoperator: A GUI which provideds following functionalities:
- A Forward Kinematics teleoperator providing sliders to change the angle of each joint of the robot arm and the gripper. The limits of each joints are shown in the two sides of the slider. The true angle of the joints are shown in the text box beside the sliders.
- An Inverse Kinematics teleoperator allowing users to set the desired end effector pose.
- Plan button can plan the trajectory to the desired pose
- Excute button can make the robot execute the planned trajectory
- Plan & Execute button is the integration of last two buttons
- Stop button allows users to stop the robot
- Back to home button can make the robot move back to home pose
- Two update button can update the value of current robot state
- Code Manager part
- Four buttons to start, stop, pause and restart the main code you program
- One button to launch Rviz
- One button to Respawn all objects in Gazebo and Rviz
- An info box showing the status of the main code(“start” or “stop”)
Then open a new terminal window, navigate to exercise folder and execute following command:
python MyAlgorithm.py
How should I solve the exercise
To solve the exercise, you must edit the MyAlgorithm.py file and insert control logic in myalgorithm() function. The path of this file is “src/rqt_kinematics/src/rqt_kinematics/interfaces/MyAlgorithm.py” inside the catkin_ws folder.
def myalgorithm(self, stopevent, pauseevent):
	############## Insert your code here ###############
    # Move the robot back to home as a start
    self.pick_place.back_to_home()

    # insert following two lines where you want to pause or stop the algorithm
    # with the stop button in GUI
    while (not self.pauseevent.isSet()) or (not self.stopevent.isSet()):
        if not self.stopevent.isSet():
            return

    ##### A brief example to pick and place object "blue_ball" #####
    object_name = "blue_ball"
    # get object pose
    pose = self.pick_place.get_object_pose(object_name)

    # generate grasp message and pick it up
    # parameters WIDTH and LENGTH need to be tuned according to the object and grasping pose
    WIDTH = 0.3
    LENGTH = 0.15
    grasp = self.pick_place.generate_grasp(object_name, "vertical", pose.position, WIDTH, length=LENGTH)
    self.pick_place.pickup(object_name, [grasp])

    # setup stop signal detector
    while (not self.pauseevent.isSet()) or (not self.stopevent.isSet()):
        if not self.stopevent.isSet():
            return

    # choose target position and place the object
    target_name = "blue_target"
    place_position = self.pick_place.get_target_position(target_name)
    self.pick_place.place("vertical", place_position)

    ####################################################
Multiple APIs can be used to implement your algorithm. They are provided in Pick_Place class, so you should allways add “self.pick_place.” as a prefix to following introduced APIs in your algorithm.
API
Environment Information
get_object_list()- Return the name list of all objects.get_object_pose(object_name)- Return the pose of the object.get_object_info(object_name)- Return the pose, height, eidth, length, shape, color of the object in order.get_target_list()- Return the name list of all targets.get_target_position(target_name)- Return the position of target where we are going to place the objects.
Convert Pose Message
pose2msg(roll, pitch, yaw, x, y, z)- Convert pose to Pose message. The unit of roll, pitch, yaw is radian.pose2msg_deg(roll, pitch, yaw, x, y, z)- Convert pose to Pose message. The unit of roll, pitch, yaw is degree.msg2pose(pose)- Convert Pose message to pose, return roll, pitch, yaw, x, y, z in order. The unit of roll, pitch, yaw is radian.msg2pose_deg(pose)- Convert Pose message to pose, return roll, pitch, yaw, x, y, z in order. The unit of roll, pitch, yaw is degree.
Basic Robot Movement
move_pose_arm(pose_goal)- Command the robot with Pose message to make its end effector frame move to the desired pose with inverse kinematics.move_joint_arm(joint_0,joint_1,joint_2,joint_3,joint_4,joint_5)- Command the robot joints to move to desired joints valuemove_joint_hand(joint_value)- Command the gripper joint to move to desired joint value.back_to_home()- Command the robot arm and gripper to move back to the home pose.
Setup Grasp message
Grasp message contains the informations that the MoveIt pick function requires.
generate_grasp(object_name, eef_orientation, position, [width, roll, pitch, yaw, length])- Returns the specified Grasp message according to related setup.eef_orientaionis to clarify the desired end effector orientation.horizontal: grasp the object with a horizontal gripper orientation. (default value: roll = pitch = yaw = 0.pitchis setable.)vertical: grasp the object with a vertical gripper orientation. (default value: roll = 0, pitch = 90°, yaw = 0.yawis setable.)user_defined: grasp the object with a user defined gripper orientation. (default value: roll = pitch = yaw = 0.roll,pitch,yaware all setable)
positionis the position of the end effector when grasping the objectwidthis the value the gripper joints should move to grasp the object with a range of [0, 0.8]. If you keep the default value 0, theeef_orientationishorizontalorverticaland the default rpy angle values are kept, this width value will be set depend on the object width.roll,pitch,yaware optional parameters.lengthis the offset length from the your desired gripper position to robot tool center. When you input grasping pose, you are specifying the pose of the desired gripper position. The default value is 0, which means you are specifying the pose of the tool center of the robot arm when the robot is grasping the object.
The default minimum grasp distance and desired distance are set to be 0.2(m) and 0.1(m). The default approach direction is set to be (0, 0, -0.5). You can keep them or modify them with following functions:
set_grasp_distance(min_distance, desired_distance)- Set the minmum distance and desired distance the gripper translates before and after grasping.set_grasp_direction(x, y, z)- Set the direction of the gripper approach translation before grasping. Retreat translation distance will set to be the opposite direction of the approach direction.
Pick and Place
pickup(object_name, grasps)- Command the industrial robot to pick up the object with a list of genrated Grasp messages.place(eef_orientation, position[, distance, roll, pitch, yaw])- Command the industrial robot to place the currently holding object to goal_position with desired end effector orientation.eef_orientaionis to clarify the desired end effector orientation.horizontal: grasp the object with a horizontal gripper orientation. (default value: roll = 0, pitch = 0, yaw = 180°.pitchis setable.)vertical: grasp the object with a vertical gripper orientation. (default value: roll = 0, pitch = 90°, yaw = 180°.yawis setable.)user_defined: grasp the object with a user defined gripper orientation. (default value: roll = 0, pitch = 0, yaw = 180°.roll,pitch,yaware all setable)
positionis the position of the end effector when placing the objectdistanceis the distance the robot arm will move in z axis when placing objects. The default value is 0.1(m)
Theory
Robot Workspace
Workspace is the space the end effector of the robot can reach. It is limited by the mechanical structure of the robot. The industrial robot providers usually provide the workspace or work range for their robot in the manual. For example, the following image is the work range of irb120 robot, the robot we use in this exercise.

When you are specifying the pose of the end effector to grasp or place the object, sometimes you will see a warning ***** GOAL POSE IS OUT OF ROBOT WORKSPACE ***** which is provided behind our API. However, as you can see, the workspace is complicated, so we only check whether the position is inside the outer sphere, outside of the inner sphere and above the bottom position. No warning doesn’t mean the position is inside the workspace.
Even if your specified position of the end effector is inside the workspace, if the orientation is not properly set, you are actually requiring other joints to move out of their workspaces.
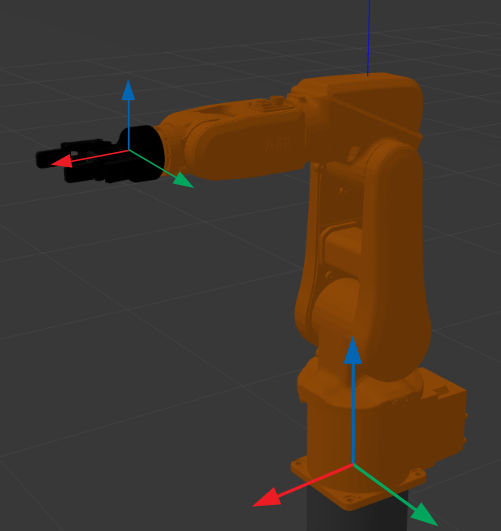
Position and Orientation
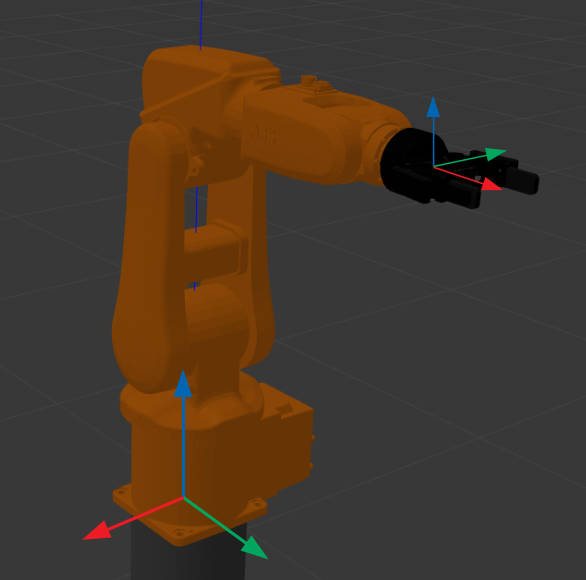
In 3D space, a rigid body has six degrees of freedom. Its pose can be fully described by position, translations in three axies(x, y, z) from origin and orientation, rotation relative to reference frame. Position can be easily descirbe with (X, Y, Z) when coordinate frame is given. In our exercise, the reference frame is the robot frame with origin in its bottom center, x-axis pointing forward, y-axis pointing leftward and z-axis pointing upward.
By contrast, orientation is harder to describe. There are many different methods to describe orientation in 3D including rotation matrix, rotation vector, euler angle, quaternion. If you want to understand more about them and has linear algebra background, have a look of this page. To finish this exercise, you only need to understand part of euler angle.
Roll, pitch, yaw are rotation angles around x, y, z axis. They are applied in order, such as x-y-z or z-y-x. Usually we use the new frame after each rotation as the new reference frame, but in tf, a ROS library for managing coordinate frames, they choose static x-y-z euler angle as default method, which means each rotation will be applied with respect to(w.r.t.) the static original reference frame. Thus, in this exercise, roll, pitch, yaw will be applied in this x-y-z order w.r.t. the robot frame.
When you use the inverse kinematic tool in GUI, sometimes you will see that the input desired orientation is much different from the final orientation values, position also has tiny difference. The reason for the tiny difference is that when the difference between final pose and desired pose is within a given range, controller will stop. The reason for the large difference in orientation is that there are some other expressions that can also describe this orientation correctly.
roll = 0, pitch = 0, yaw = 0
roll = 90, pitch = 0, yaw = 0
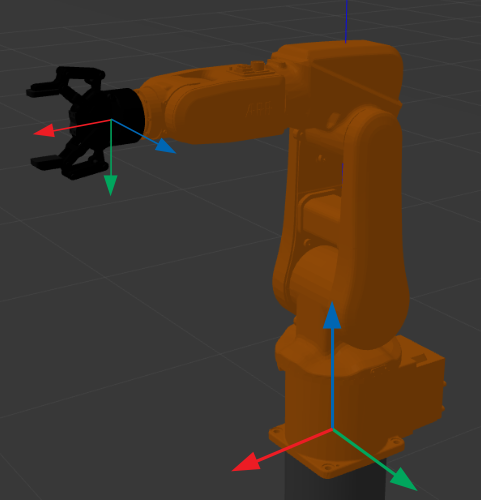
roll = 0, pitch = 90, yaw = 0
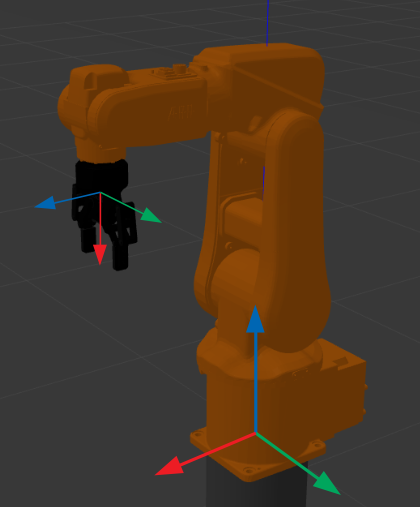
roll = 0, pitch = 0, yaw = 90
Forward Kinematics and Inverse Kinematics
Forward kinematics is given the value of each joints, to find the pose of the end effector. The pose is unique.
Inverse kinematics is given the pose of the end effector, to find possible joints value and trajectory to move from start state to goal state. There are usully multiple solutions.
Hints
Relationship among ROS, MoveIt, Rviz, Gazebo, JdeRobot provided API
- ROS(Robot Operating System) is a robotics middleware which contains a set of open source libraries for developing robot applications.
- MoveIt is an open source Motion Planning framework for industrial robot which integrates motion planning, collision checking, manipulation, 3D perception capabilities.
- Rviz is a 3D visualization tool for ROS. Many ROS topics can be visualized in Rviz, including the planning scene of MoveIt move group, but it does not contain any physics simulation capability.
- Gazebo is a physics simulator mainly use for robot simulation.
- The APIs provided by JdeRobot Academy are based on the above tools, so the user don’t need to learn all of them to start simulation of industrial robot manipulation.
Objects visualization
When we start Gazebo with a world file, the objects in Gazebo will not be automatically added in the planning scene of MoveIt, so we can only see the robot in Rviz without any other objects. If we want MoveIt to know there are some objects in the environment, we should manually add them into the planning scene, but you don’t need to worry about it in this exercise as it has been done by us.
Obstacle Avoidance
After adding objects into planning scene, MoveIt will avoid planning trajectory for the robot that will lead to collision. However, because the object in planning scene cannot be updated automatically with their pose in Gazebo, after the robot grasping them, we cannot track their poses any more, so MoveIt cannot take them into consideration of obstacle avoidance.
Pick and Place
Moveit provides pick and place functions. We can perform great pick and place in planning scene with them, but at the same time, you will see that the objects cannot be picked up in Gazebo. The reason for it is that Gazebo, as a physical simulator, still cannot simulate the contact between two surface perfectly. Even if we can see the robot pick up the object successfully in Rviz, it might not work in Gazebo.
Object and Target lists:
Object list:
- yellow_box
- red_box
- blue_box
- blue_ball
- yellow_ball
- green_ball
- green_cylinder
- red_cylinder
Target list:
- red_target
- green_target
- blue_target
- yellow_target
Why does the robot sometimes cannot move to some desired pose?
The most possible reason is that your specified pose is unreachable for the robot arm, so MoveIt cannot plan a trajectory from current pose to desired pose in limited time. You will see such a warning when this problem happened:
Fail: ABORTED: No motion plan found. No execution attempted.
Ignorable ERROR and WARNING
No p gain specified for pid.Controller is taking too long to execute trajectoryController failed with error GOAL_TOLERANCE_VIOLATED
Demonstration video of the solution