This is a draft of the documentation of second exercise.
The goal of this exercise is to learn how to use vision to assist industrial robot by detecting known objects and unknown obstcles. You will need to complete pick and place task using a robot arm and vacuum gripper. Two kinect camera, one fixed to the world and another one fixed to the robot end effector, will be provided. The shape, size and color of the objects are known, but the pose of them and the situation of obstacles in surrounding environment need to be found using two cameras.
Installation
- Install the General Infrastructure of the JdeRobot Robotics Academy.
- Install PCL and octomap related packages
sudo apt-get install ros-melodic-octomap-ros sudo apt-get install ros-melodic-octomap-msgs sudo apt-get install ros-melodic-octomap-rviz-plugins sudo apt install libpcl-dev sudo apt-get install ros-melodic-perception-pcl - Install Industrial Robot package
If you have done this part in other Industrial Robots exercises, you can skip to next section.
mkdir -p catkin_ws/src
cd catkin_ws/src
after pull request to the industrial robot repo
git clone https://github.com/JdeRobot/IndustrialRobotics.git -b pick_place_basic
cd ..
Update ROS dependencies
rosdep update
rosdep check --from-paths . --ignore-src --rosdistro melodic
rosdep install --from-paths . --ignore-src --rosdistro melodic -y
Build workspace
catkin buildExport environment variables
echo 'source '$PWD'/devel/setup.bash' >> ~/.bashrc
echo 'export GAZEBO_MODEL_PATH=${GAZEBO_MODEL_PATH}:'$PWD'/src/IndustrialRobotics/assets/models' >> ~/.bashrc
source ~/.bashrc
How to run the exercise
TO launch the exercise, open a terminal windows, navigate to navigate to machine_vision folder inside exercises folder and execute following command:
roslaunch machine_vision.launch
Two different windows will pop up:
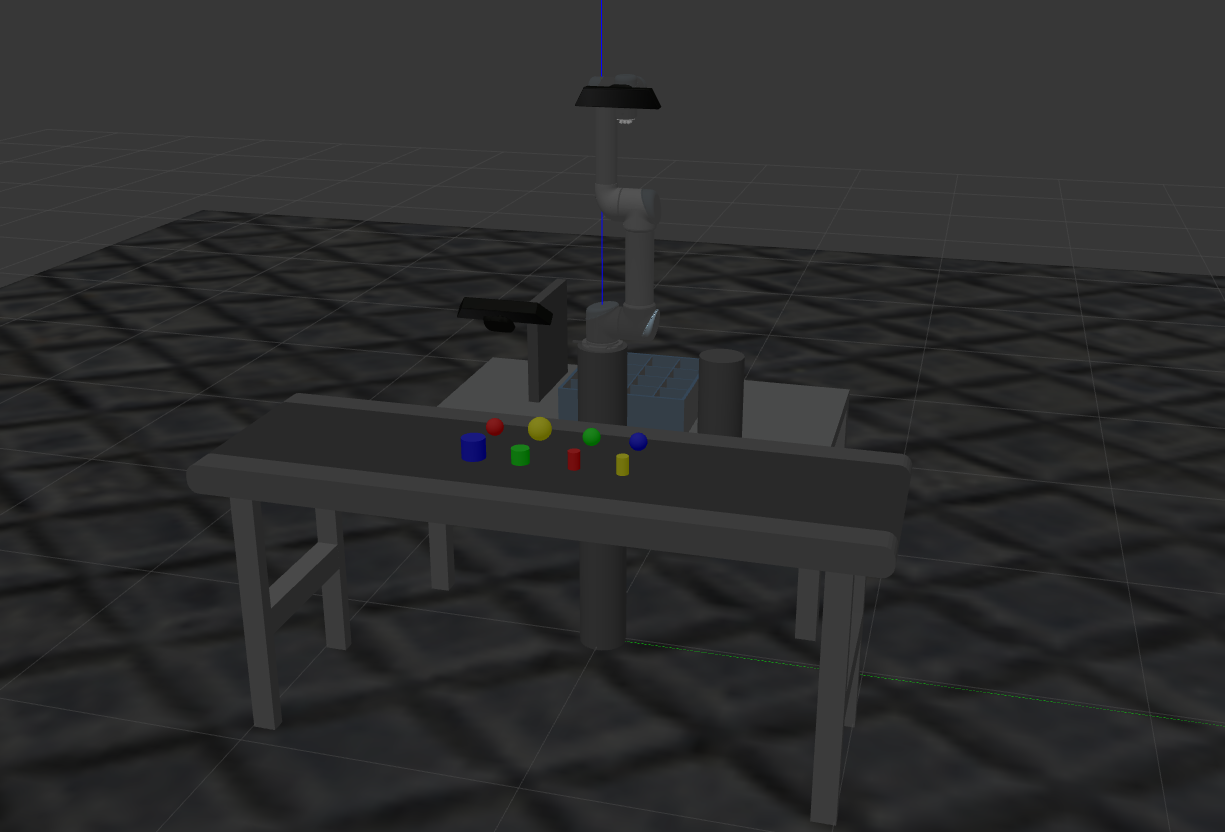
- Gazebo simulator: A warehouse environment with a industrial robot(robot arm and gripper), multiple objects, a conveyor and two boxes will be shown in Gazebo.
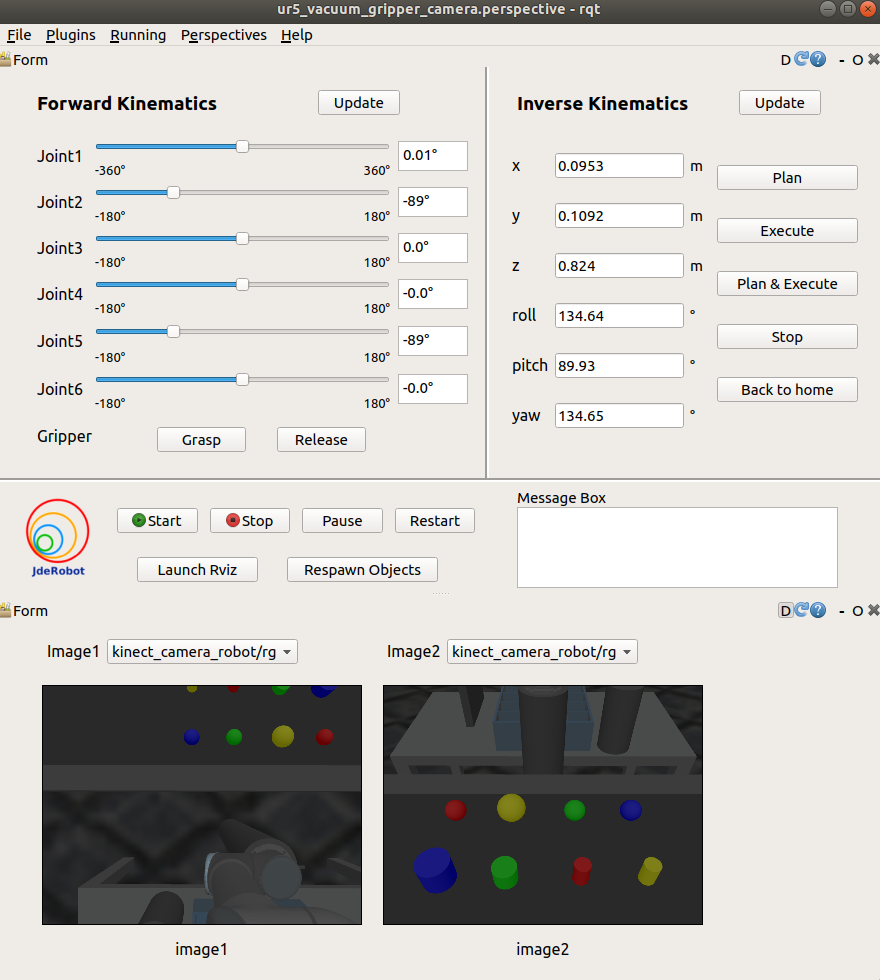
- Industrial robot teleoperator: A GUI which provideds following functionalities:
- A Forward Kinematics teleoperator providing sliders to change the angle of each joint of the robot arm and the gripper. The limits of each joints are shown in the two sides of the slider. The true angle of the joints are shown in the text box beside the sliders.
- An Inverse Kinematics teleoperator allowing users to set the desired end effector pose.
- Plan button can plan the trajectory to the desired pose
- Excute button can make the robot execute the planned trajectory
- Plan & Execute button is the integration of last two buttons
- Stop button allows users to stop the robot
- Back to home button can make the robot move back to home pose
- Two update button can update the value of current robot state
- Code Manager part
- Four buttons to start, stop, pause and restart the main code you program
- One button to launch Rviz
- One button to Respawn all objects in Gazebo and Rviz
- An info box showing the status of the main code(“start” or “stop”)
- Camera viewer
- Two combo boxs to choose image topics to show in below image windows
- Two image windows to show chosen image topics
Then open a new terminal window, navigate to machine_vision folder inside exercises folder and execute following command:
python MyAlgorithm.py
You can start running the algorithm with the start button when you see You can start your algorithm with GUI in the terminal.
How should I solve the exercise
To solve the exercise, you must edit the MyAlgorithm.py file and insert control logic in myalgorithm() function. Before writing the main logic, you should implement build_map() function to detect obstacles in surrounding environments and get_object_position() function to detect the position of the objects.
def build_map(self):
    ############## Insert your code here ###############
    self.pick_place.send_message("Building map")

    ####################################################

def get_object_position(self, object_name):
    ############## Insert your code here ###############

    return position
    ####################################################

def myalgorithm(self, stopevent, pauseevent):
	############## Insert your code here ###############
    self.build_map()

    # Move the robot back to home as a start
    self.pick_place.back_to_home()

    # insert following two lines where you want to pause or stop the algorithm
    # with the stop button in GUI
    while (not self.pauseevent.isSet()) or (not self.stopevent.isSet()):
        if not self.stopevent.isSet():
            return

    ##### A brief example to pick and place object "green_cylinder" #####

    # get object position and pick it up
    # parameters HEIGHT_OFFSET need to be tuned according to the object height
    object_name = "green_cylinder"

    position = self.get_object_position(object_nam)
    self.pick_place.pickup(object_name, position)

    # setup stop signal detector
    while (not self.pauseevent.isSet()) or (not self.stopevent.isSet()):
        if not self.stopevent.isSet():
            return

    # choose target position and place the object
    target_name = "target6"
    position = self.pick_place.get_target_position(target_name)
    self.pick_place.place(object_name, position)

    ####################################################
Multiple APIs can be used to implement your algorithm. They are provided in Pick_Place class, so you should allways add “self.pick_place.” as a prefix to following introduced APIs in your algorithm.
API
Detect Object
start_color_filter(color, rmax, rmin, gmax, gmin, bmax, bmin)- Start color filter for givencolorwith RGB range for thiscolor. Two messages,$(color)_filter(pointcloud) and$(color)_filtered_image(RGB image), will be published until stopping withstop_color_filterfunction.stop_color_filter(color)- Stop the color filter for givencolor.start_shape_filter(color, shape, radius)- Start the shape filter to detect one set of pointcloud that can represent the inputshapeand has a smaller than inputradiussize from color filtered poindcloud. If the filter can detect a possible shape from pointcloud, two messages,$(color)_$(shape)(pointcloud) and$(color)_$(shape)_image(depth image), will be published until stopping withstop_shape_filterfunction. A frame called$(color)_$(shape)will be added in tf tree. The origin of the frame is the center of prediected sphere center of a point in the center axis of predicted cylinder.stop_shape_filter(color, shape)- Stop the shape filter.get_object_position(color, shape)- If a frame named with$(color)_$(shape)exists in tf tree, output is the transformation from this frame to world frame. If not, output is None.
Environment Information
get_object_list()- Return the name list of all objects.get_object_info(object_name)- Return the height, width, length, shape, color of the object in order.get_target_list()- Return the name list of all targets.get_target_position(target_name)- Return the position of target where we are going to place the objects.
Convert Pose Message
pose2msg(roll, pitch, yaw, x, y, z)- Convert pose to Pose message. The unit of roll, pitch, yaw is radian.pose2msg_deg(roll, pitch, yaw, x, y, z)- Convert pose to Pose message. The unit of roll, pitch, yaw is degree.msg2pose(pose)- Convert Pose message to pose, return roll, pitch, yaw, x, y, z in order. The unit of roll, pitch, yaw is radian.msg2pose_deg(pose)- Convert Pose message to pose, return roll, pitch, yaw, x, y, z in order. The unit of roll, pitch, yaw is degree.
Basic Robot Movement
move_pose_arm(pose_goal)- Command the robot with Pose message to make its end effector frame move to the desired pose with inverse kinematics.move_joint_arm(joint_0,joint_1,joint_2,joint_3,joint_4,joint_5)- Command the robot joints to move to desired joints valueback_to_home()- Command the robot arm and gripper to move back to the home pose.gripper_grasp()- Turn on the vacuum gripper.gripper_release()- Turn off the vacuum gripper.
Pick and Place
pickup(object_name, position[, distance])- Command the industrial robot to pick up the object by moving the end effextor to given position. Distance is the distance the robot arm will move in z axis before and after grasping objects.place(object_name, position[, distance])- Command the industrial robot to place the object by moving the end effextor to given position. Distance is the distance the robot arm will move in z axis before and after placing objects.
Theory
Object Detection
In this exercise, object detectors are implemented based on Point Cloud Library(PCL). It is an opensource point cloud processing library. There are multiple methods to detect the pose of known objects with vision. The method we choose here is fully based on pointcloud.
Assume that we only know the color, size and shape(sphere or cylinder) of the object we want to pick. Firstly, a color filter will filter out all points that are not inside chosen RGB range. Secondly, a shape segmentation will be done to find points that have the highest possibility to be a part of chosen shape and size. Some parameters about this possible shape will also be provided by the segmentation filter. With these informations, we are able to find the position of sphere or cylinder.
Obstacle Detection and Avoidance
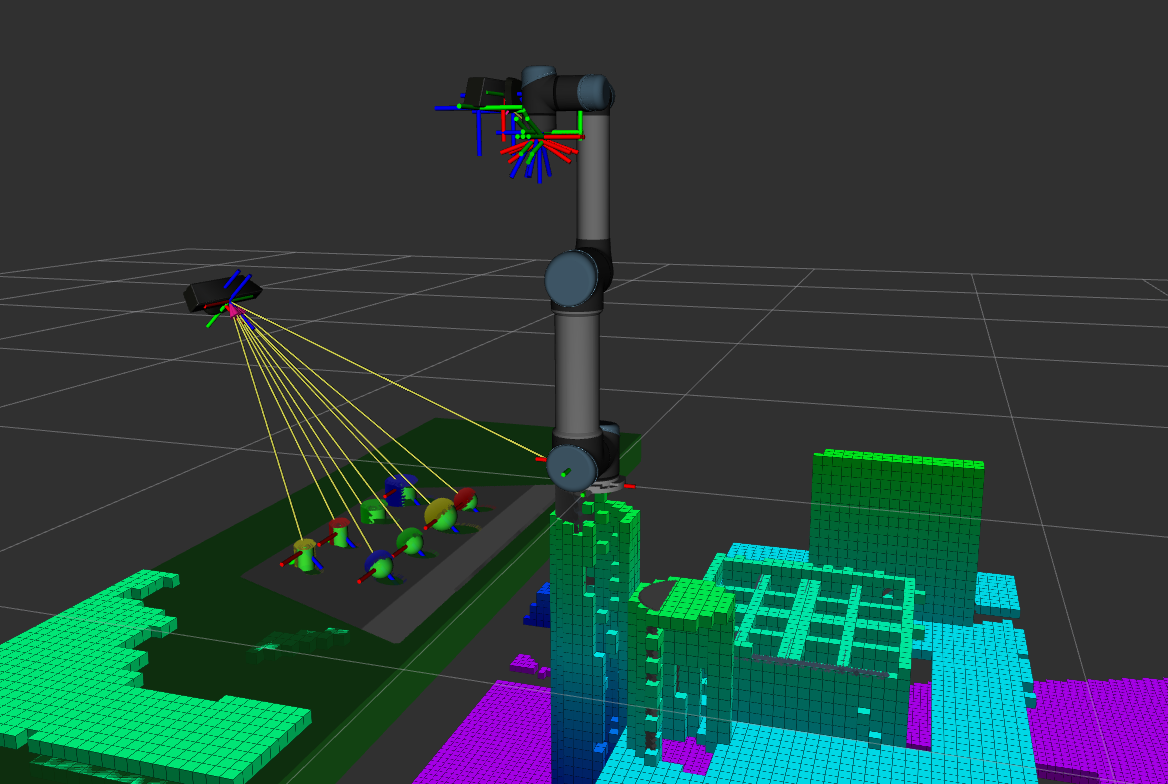
In Pick and Place exercise, we have introduced that objects in planning scene will be considered as obstacles when doing motion planning to avoid collision. Obstacles are known and added into planning scene in that exercise, but what if we have no information about the surrounding environment? Obstacle detection will be necessary.
Obstacle detection can be done using many different sensors. What we use in this exercise is kinect camera which provides rgb image, depth image and pointcloud. Pointcloud from camera is what we finally use to build the obstacle map. Pointcloud contains the position of points and points can represent obstacles. If we merging these points and representing each of them with small cube, we will build a simplified map with obstacles in planning scene.
Hints
How to write buildmap() function:
The pointcloud from the camera fixed to the robot will be automatically monitored occupancy_map_monitor/PointCloudOctomapUpdater to update the planning scene, so what you have to do is move the robot around and make sure that the camera fixed to the robot can take image of all surrounding environent inside robot workspace.
How to write get_object_position() function:
- Get the color, shape and size of the object.
- Choose RGB range for the color filter and start it. Check the color filter result with image viewer or Rviz and tune parameters to get better result.
- Choose the radius for the shape filter and start it. Check the shape filter result and tune parameters to get better result.
- Check the position output from
get_object_positionAPI. - Return the position of detected object when getting a relaticely stable object position.
Note: Please remember to stop the color filter and shape filter after getting the object position. If too many filters are running at the same time, you might not be able to get a stable result.
How to check the result of color filter and shape filter?
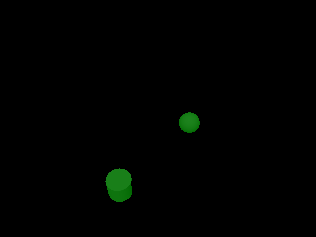
Two image windows are provided in GUI. You can choose corresponding topic to check the result. All filtering process are done with pointcloud. The image is the projection of the pointcloud. From the image side, the expected result for color filter is that only the part with your chosen RGB value will be shown with original color in the image. All filtered out parts are black. The expected for shape filter is that only the points related to the detected shape will be shown with non-black color in the image. If nothing is detected, the whole image is black or you won’t see the image change from the previously chosen image. Here are the results(topic: “green_filtered_image” and “green_cylinder_image” of detecting green cylinder.

To view 3D pointcloud, you need to launch Rviz and change the topic of Poindcloud to the topic you want to check. If nothing is detected, you will see nothing new in Rviz after choosing the topic. Here are the pointcloud results(topic: “yellow_filter” and “yellow_cylinder”) of detecting yellow cylinder.

Object and Target lists:
Object list:
- red_ball
- green_ball
- blue_ball
- yellow_ball
- red_cylinder
- green_cylinder
- blue_cylinder
- yellow_cylinder
Target list: target_ID, ID are integers from 1 to 16